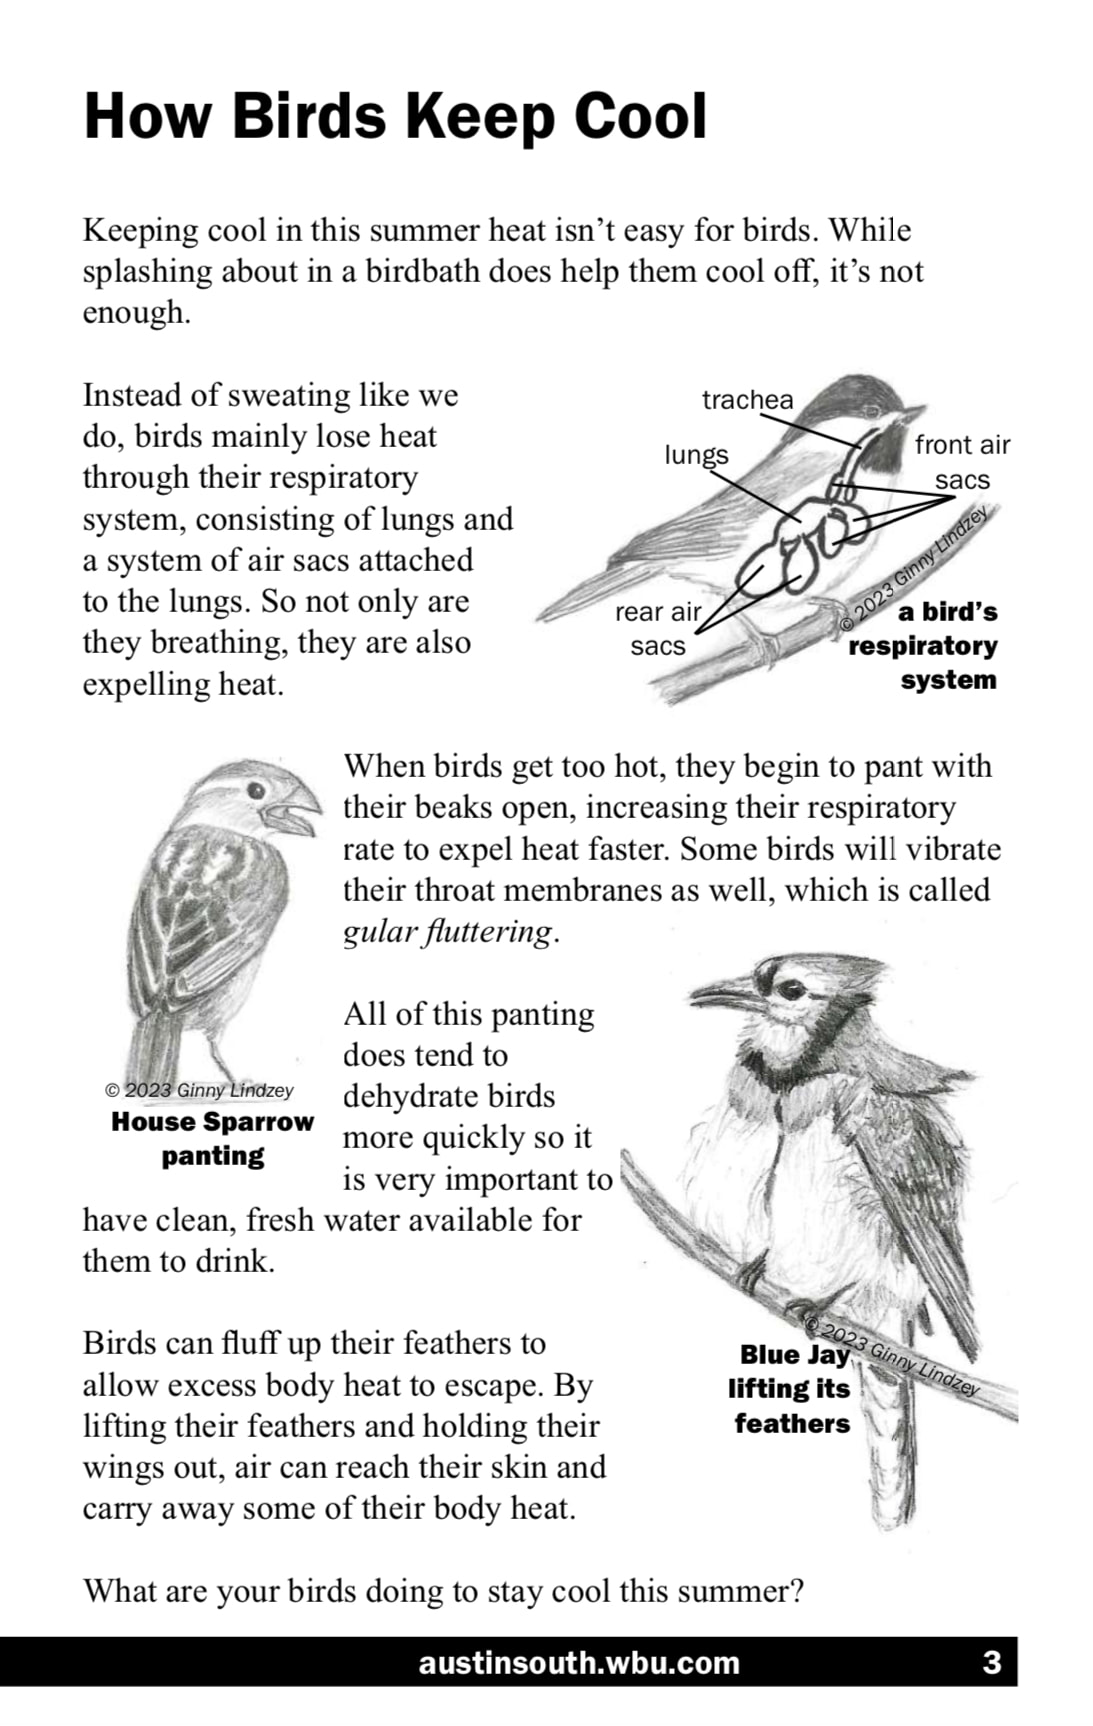
0 Comments
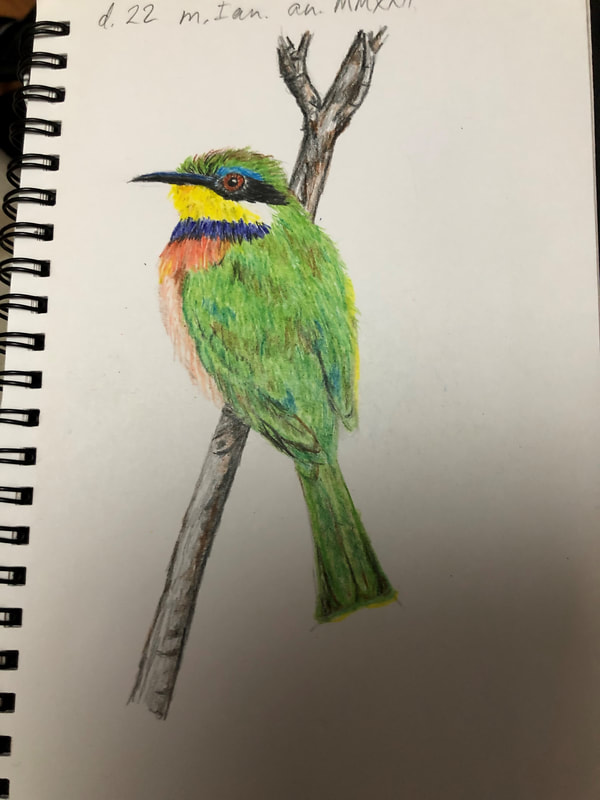
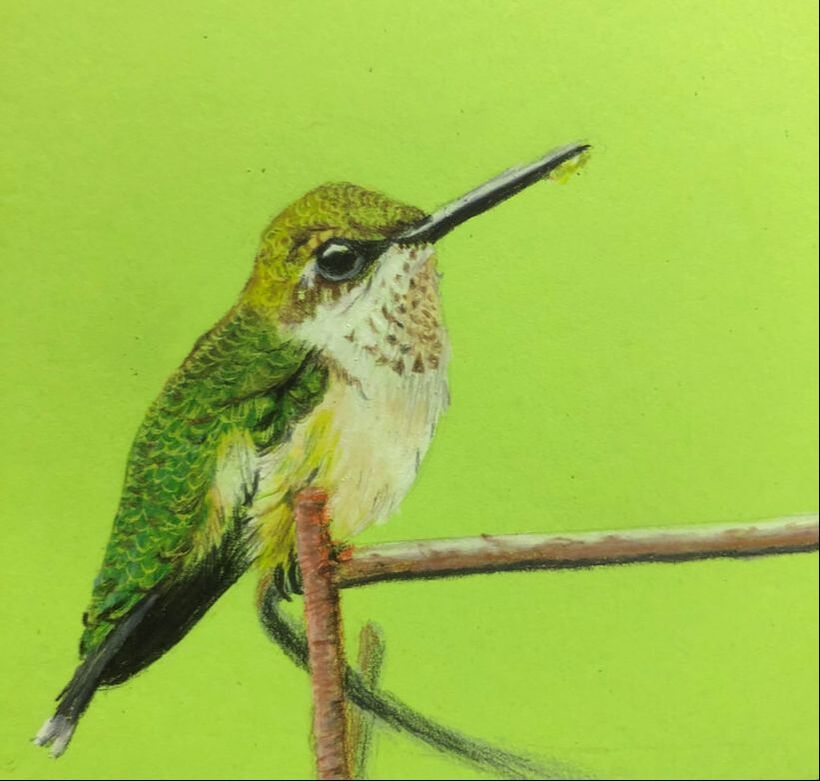
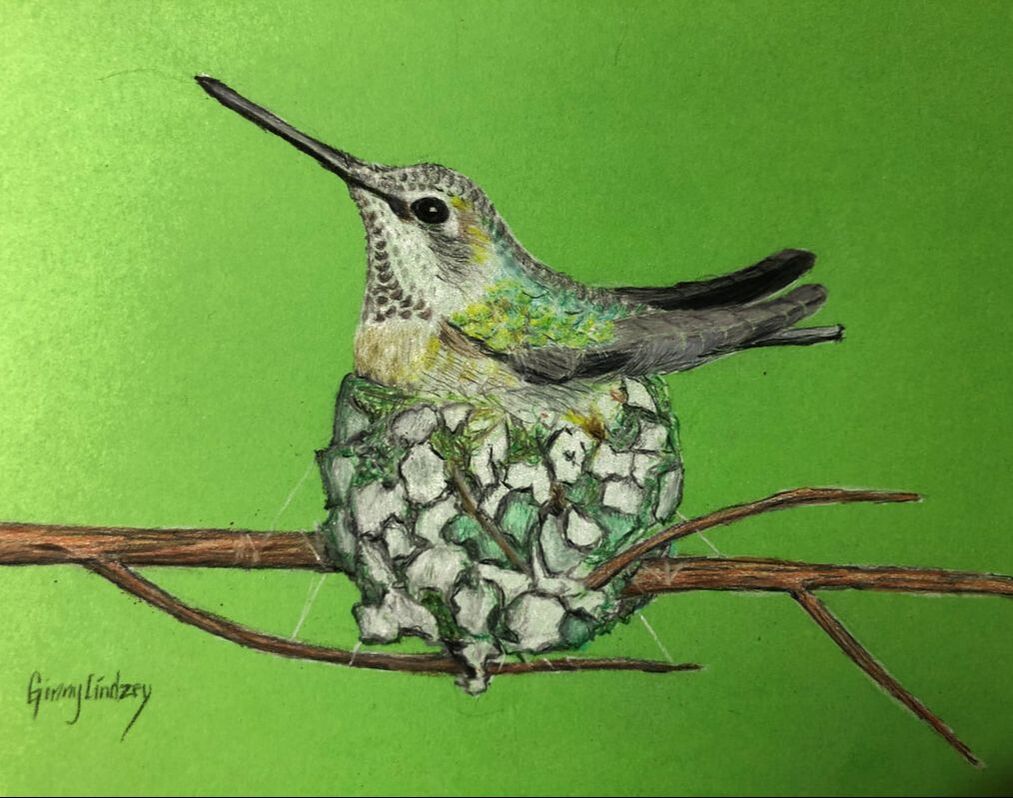
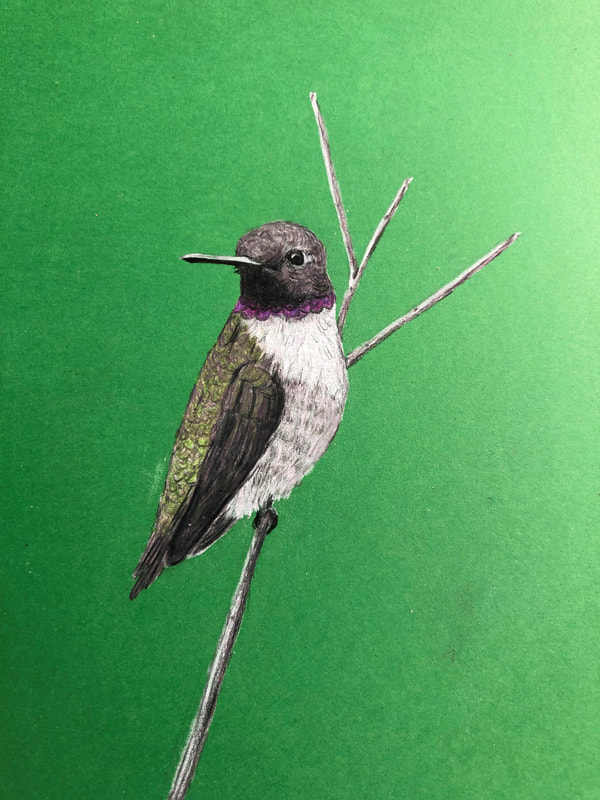
I cannot believe I haven't posted anything in a year. I moved and have been dealing with a lot of changes in my life since my ex passed away last June. But I have continued to draw. As always, some are better than others. If nothing else, I have continued to learn. 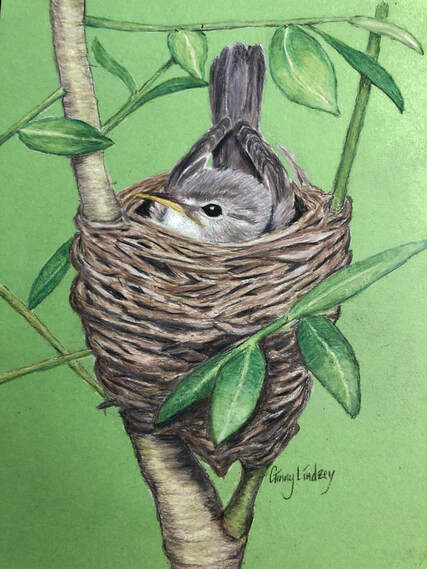 The above is a European Reed Warbler which I drew in April of 2022. This would have been a bird the Ancient Romans would have seen and in fact did see as attested in frescoes covered by the eruption of Mt Vesuvius. I found it interesting that when reading about birds depicted in the ancient world that very few are in nests. But I liked the photo of this one and wanted the challenge of drawing the nest and foliage. 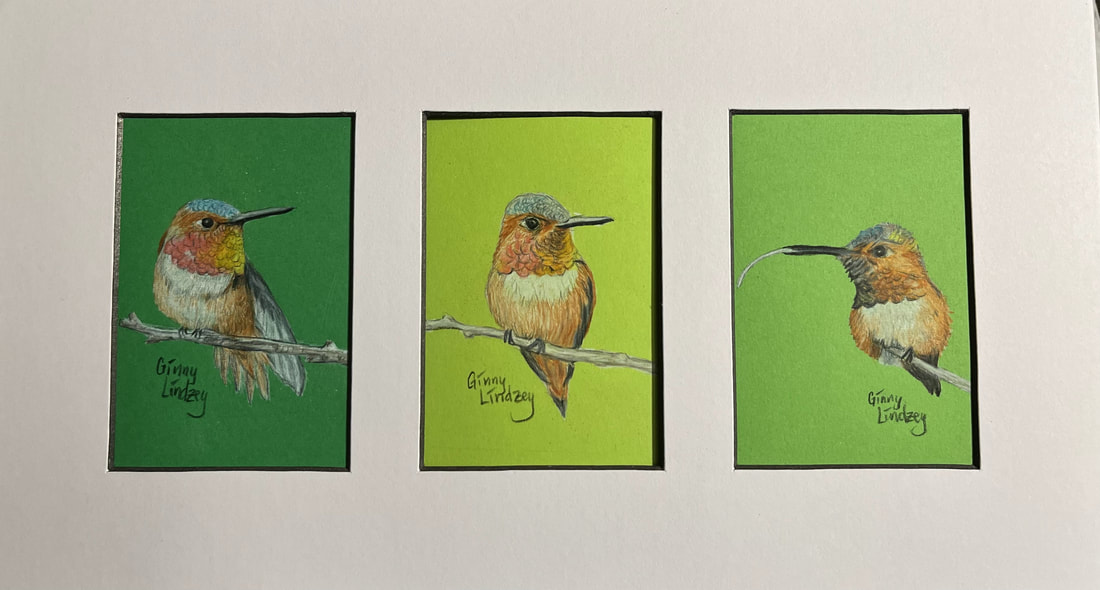 The nest was a lot of work so my next project was a trio of Rufous Hummingbirds that included one sticking it's tongue out. In my mind he's sticking it out at the other two who are looking on disapprovingly. I drew this in May of 2022. 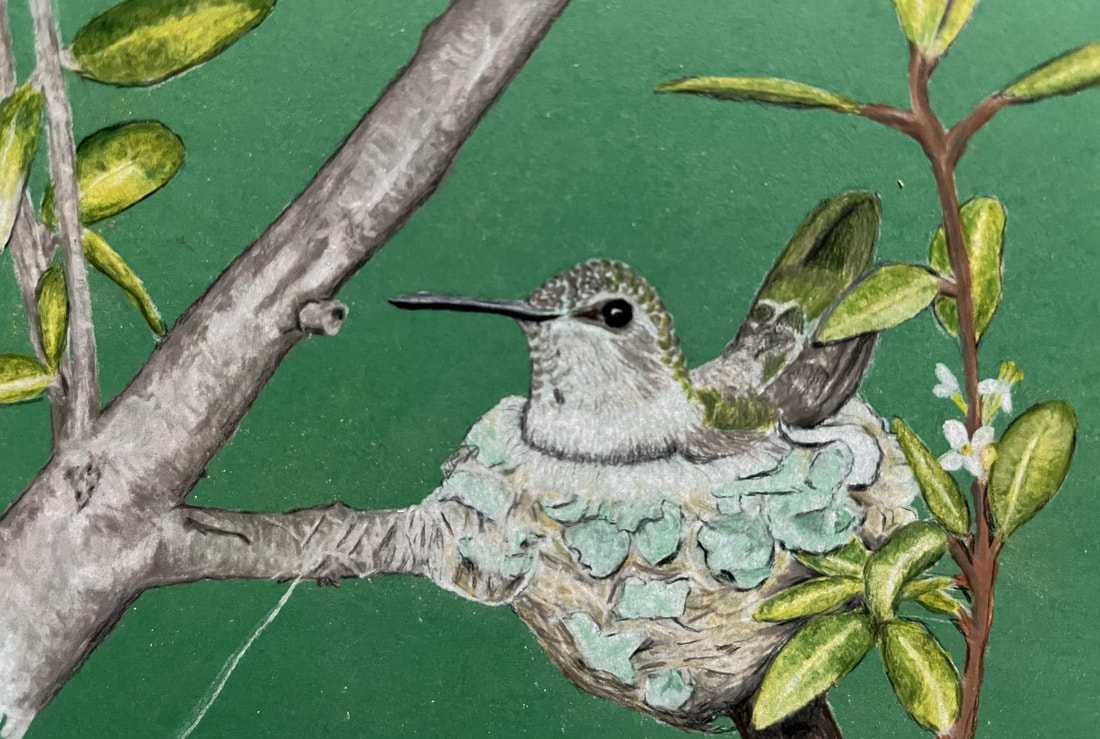 I drew this momma Black-Chinned Hummingbird in May of 2022 as well. There is something fascinating about those tiny little nests constructed with spider webs and other fibers. (I gifted this one to MBV.)  June was busy with packing and moving. I didn't draw anything worthy. But in July of 2022 I tried my hand at a Painted Bunting splashing in the water. (I gifted this one to my mother.)
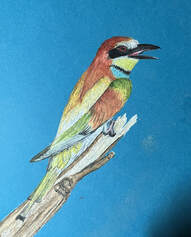
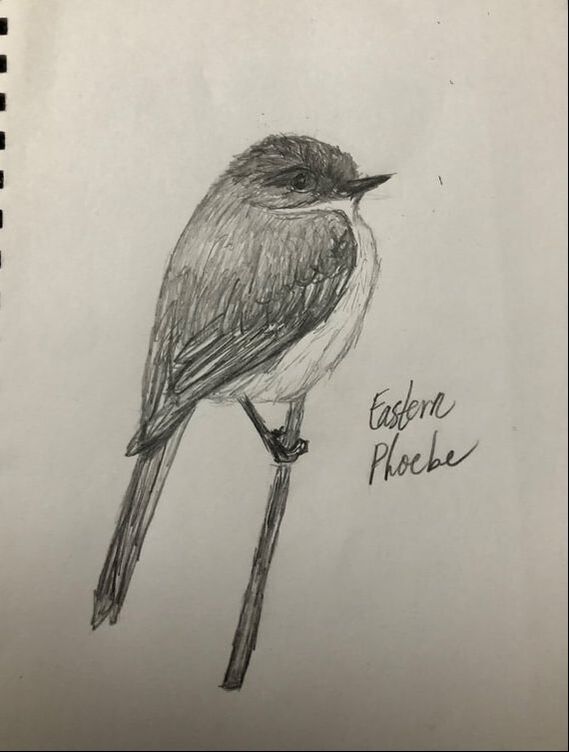
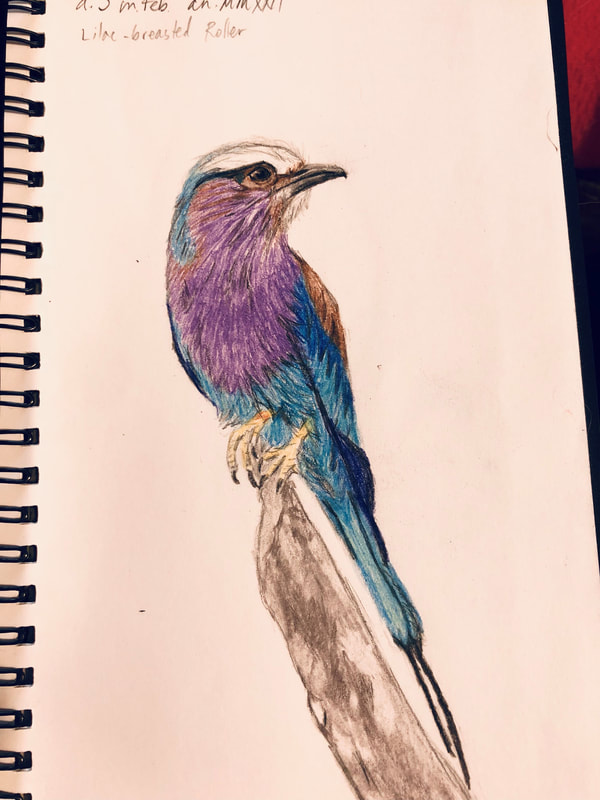
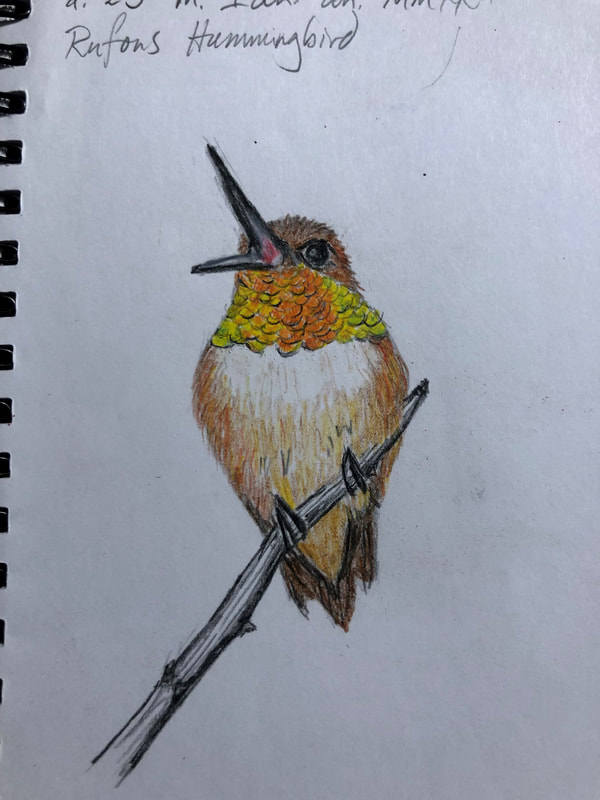
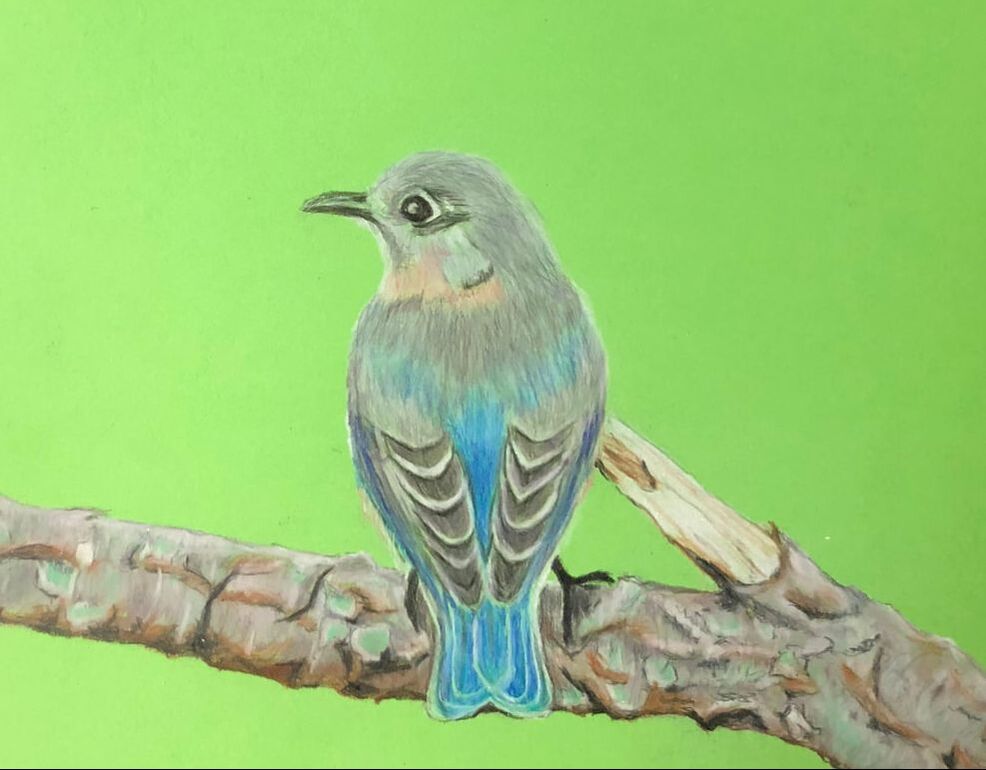
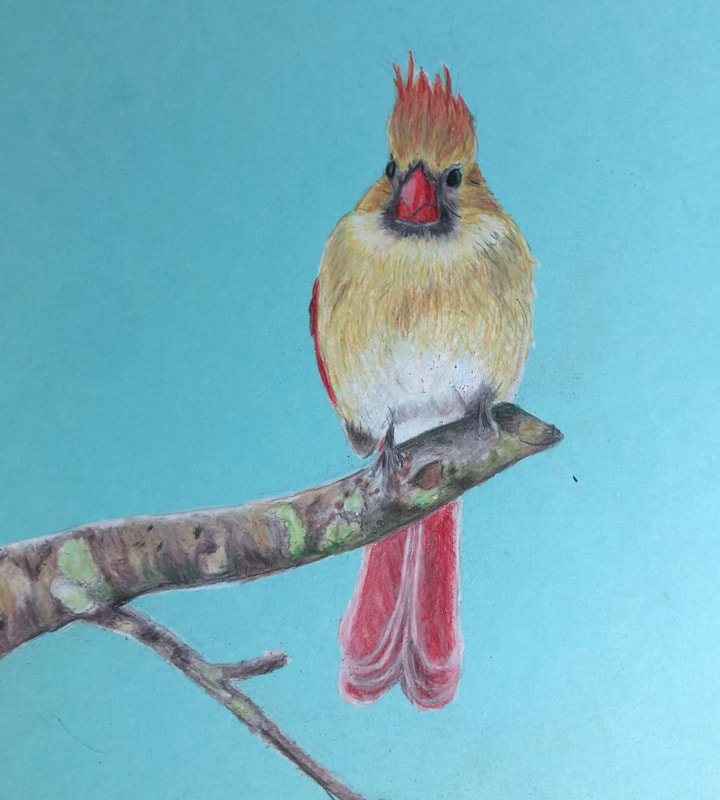
Admittedly I wasn't very happy with how the next two birds turned out. They seem rather flat or off something. The one on the left is a Black Crested Titmouse (August 2022) and a European Bee Eater (September 2022). But I will go ahead and include them here. 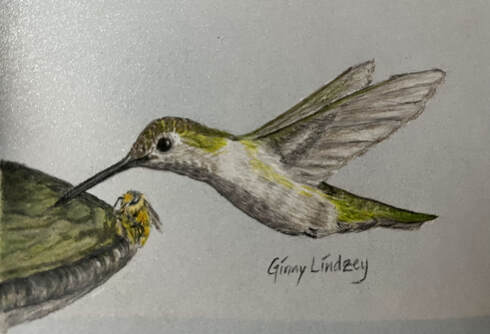 I drew this hummingbird and bee in late September of 2022. I worked harder on shading and light and am fairly pleased with the outcome. (I gifted this one to my friend RR.) 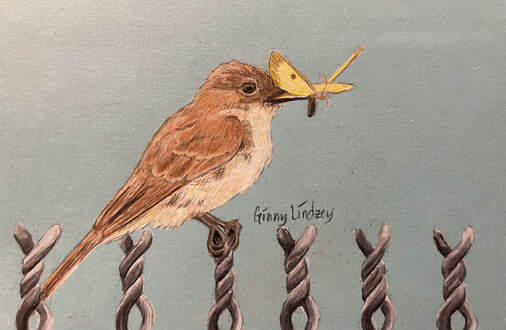 In October of 2022 I drew this Eastern Phoebe. I was so focused on trying to get the twisted metal of the fence right that the bird itself is flat. Once again, I wasn't working hard enough on highlights and lowlights. 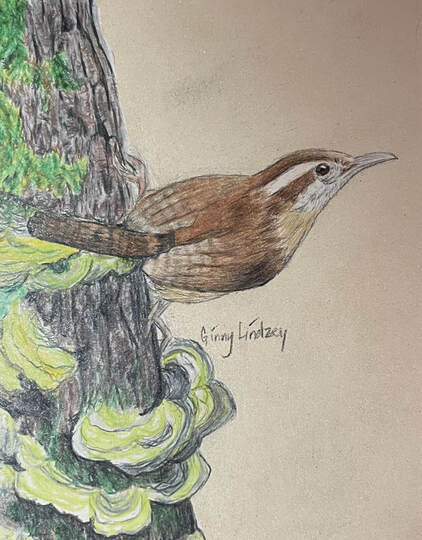 I thought this Carolina Wren on a tree would be interesting in December of 2022, but admittedly lost interest with the fungus on the tree. The camera catches more wrong with it than just the eye. And I had for the last three drawings been experimenting with a lighter colored sparkly paper which I finally decided was not really effective. 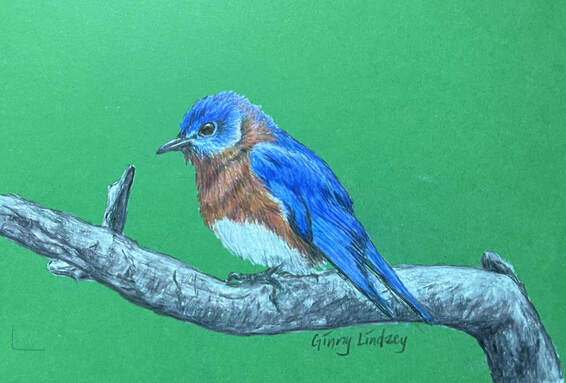 Returning to the darker paper color, I drew this Eastern Bluebird in December of 2022. (I gifted this one to AWK.) 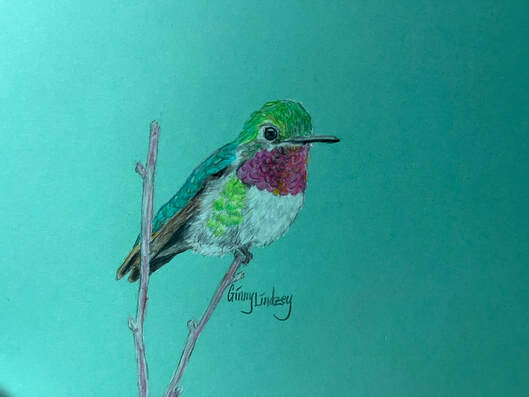 I liked the iridescent pink feathers of this Broad-Tailed Hummingbird. I didn't really do it justice but I enjoyed drawing it all the same. I finished this in late December of 2022. 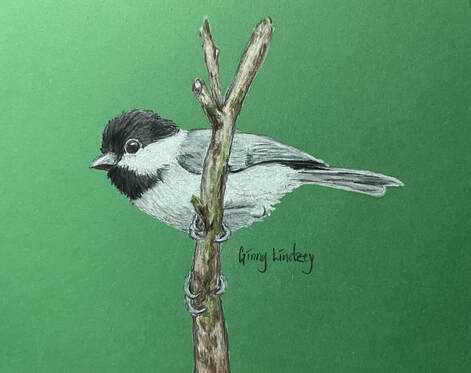 I drew this little Carolina Chickadee in January of 2023. I have been trying to capture the cute look of this perky little bird and feel happy with this effort. 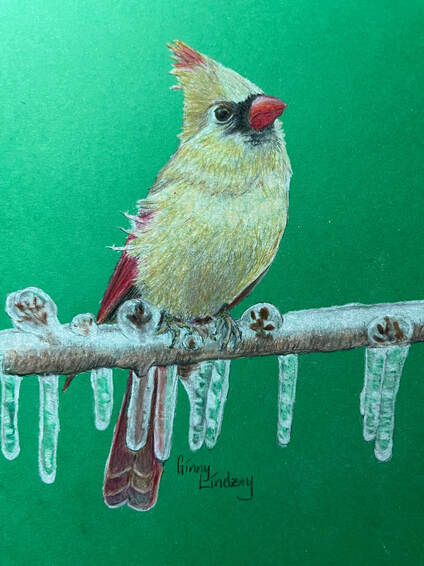 I liked the look on this female Cardinal's face with that cock of the head, but what really attracted me to draw this picture was wondering whether I could draw ice. This was my first attempt. January 2023 (before the Texas ice storm) 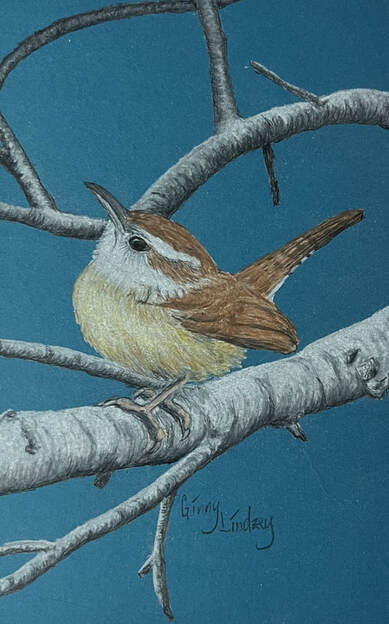 I drew this Carolina Wren in late January 2023. I enjoyed working on all the branches of the tree and feel like I was able to give this image the depth it needed. 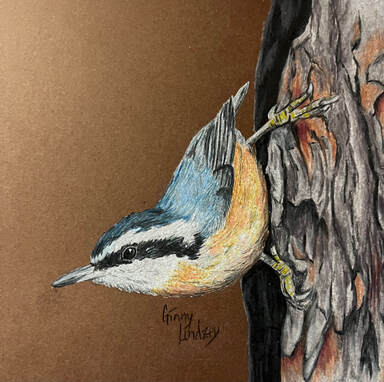 In February 2023 I decided to draw a different bird. This is a Red-Breasted Nuthatch. I really liked not only the look in its eye but also the bark of the tree. I was pleased with how it turned out. 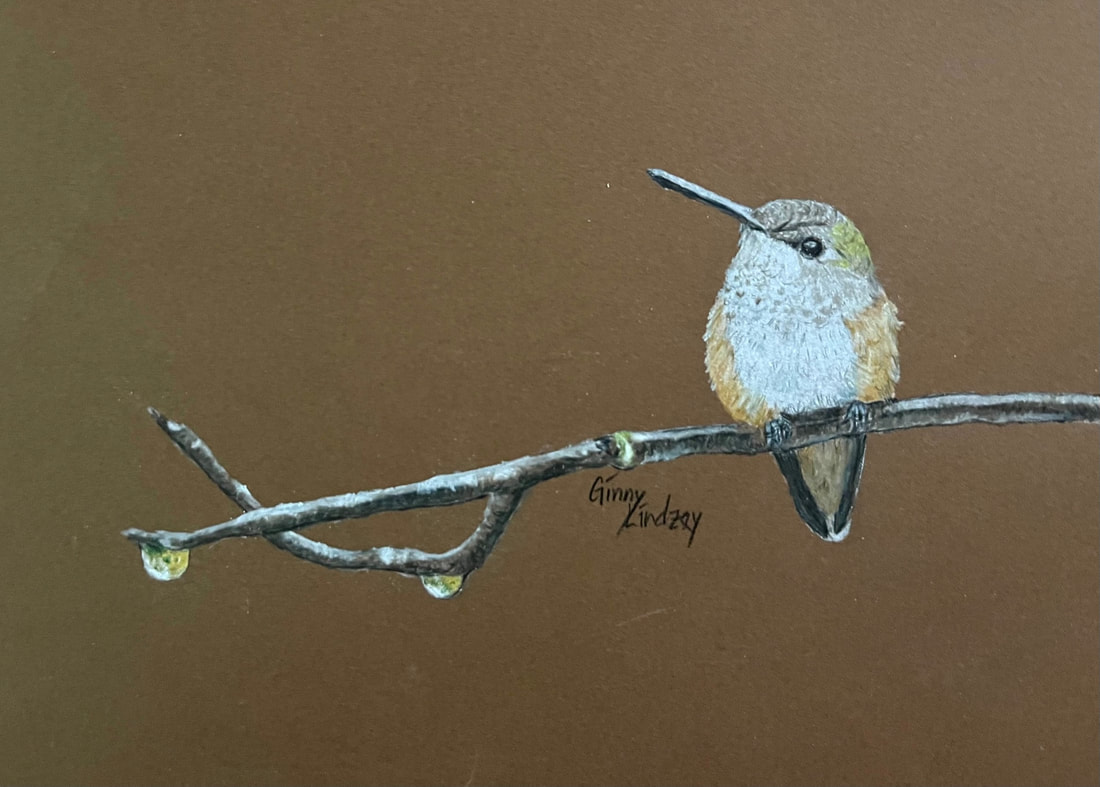 This little Rufous on a wet branch was drawn in February of 2023. I liked the challenge of drawing the water drops after the experience of drawing the icicles. I worked hard to capture the upside down world surrounding the tree this hummer was in. I think those two drops are much better than the icicles. 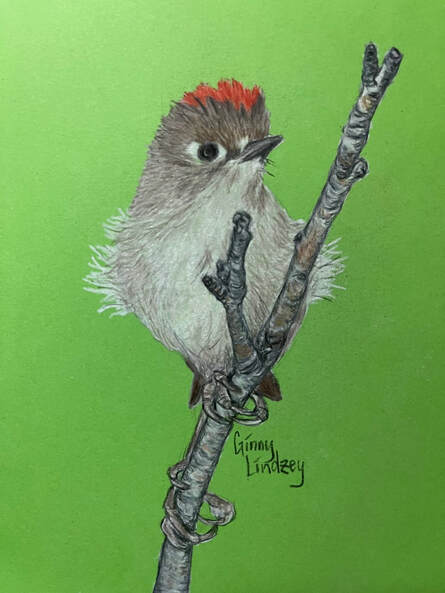 This wind-swept birdy is a Ruby-Crowned Kinglet. I drew it in March of 2023 at the same time I had one visiting me in my backyard. 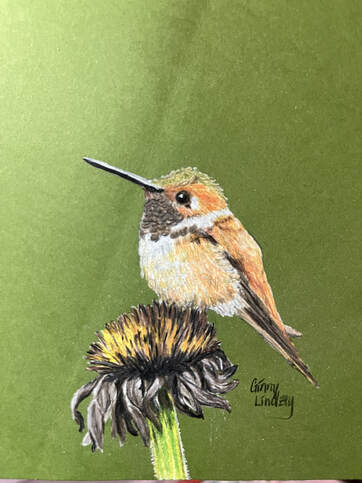 I drew this little Rufous (not sure why I like them so much) because I wanted to see whether I could draw the flower. Then I accidentally sat on it and bent the paper. While drawing with colored pencils means I can do art anywhere, there are aspects like this when I do something stupid. Oops. March 2023.
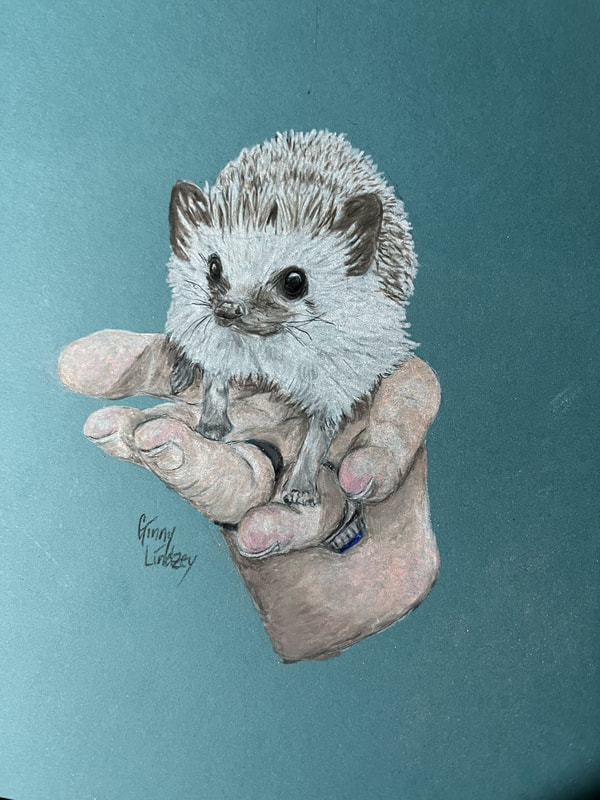
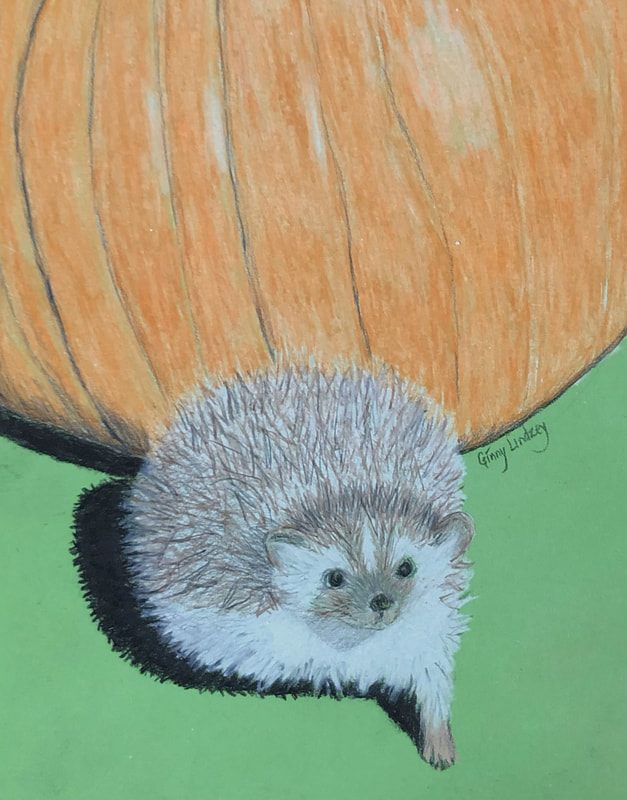
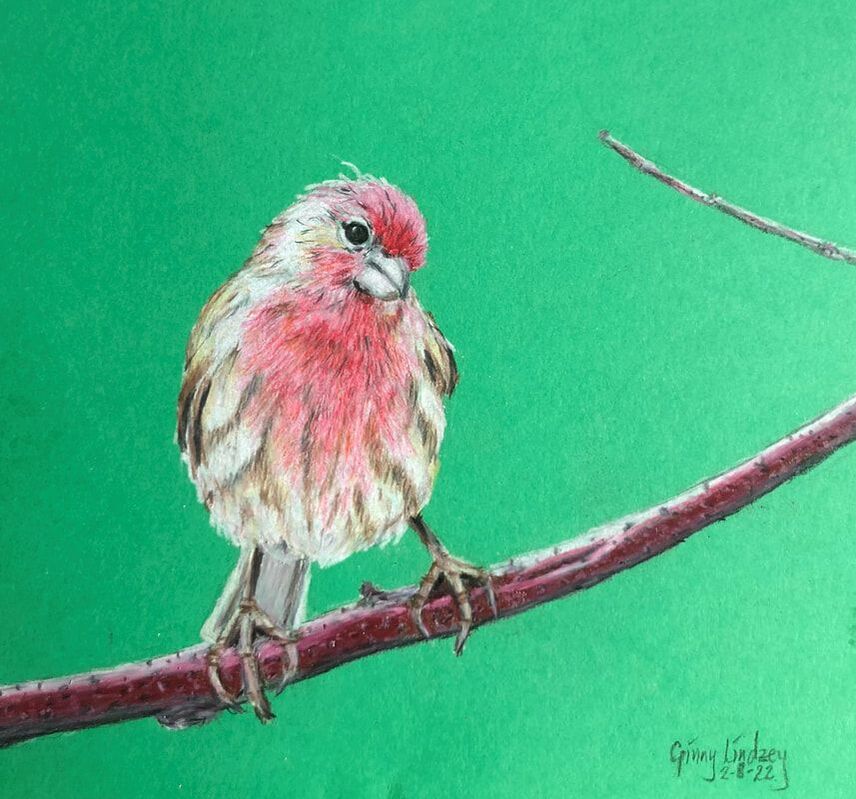
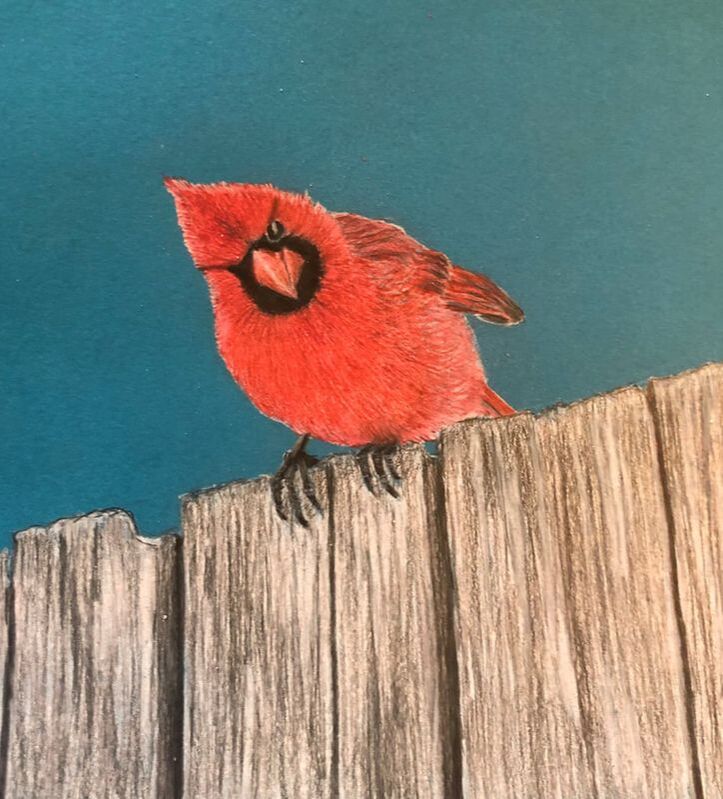
Also in March 2023 I drew the picture on the left of Tobin's new hedgehog, Touya. He's a lively, cute hedgie. The picture on the right I drew in February of 2022 of Tobin's previous hedgehog, Cyndaquil, who was a little fatty. When the two pictures are put side by side, I feel one can really see the improvement in my skills. Also, Touya just has a lot more character than Cyndaquil ever did. I'm also pleased with how Tobin's hand turned out. 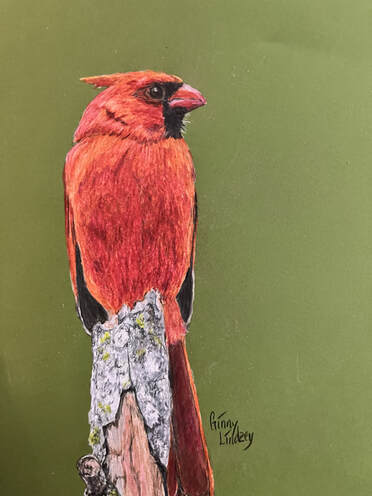 I liked the stern look of this stately Cardinal. I drew him last month (March 2023) and was pleasantly surprised at how it turned out. 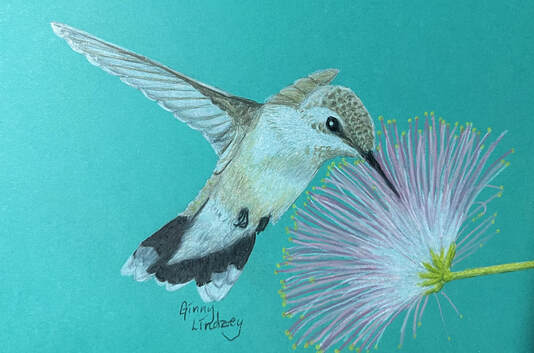 And this Black-Chinned Hummingbird drinking nectar from this Mimosa flower is my last drawing finished at the end of March 2023.
And that gets this blog caught up. Admittedly there have been a couple of drawings that ended so poorly that I haven't included them. I refer to them as my art therapy. Finding time to work on my mosaics became next to impossible since I began work at Wild Birds Unlimited. However, I needed something to do when hanging with my son at my ex's. I used to grade. Last year I was revising old teaching materials to keep on this website, and even last fall I was working on a presentation for TCA. But I needed something else that didn't involve Latin. One day while listening to a friend reading from her novel on a zoom, since I wasn't home and couldn't work on a mosaic while she read, I decided to draw. I have done this before when she read, usually when I am in England and this is happening in person. But I never took it seriously. It was more always training to learn how to "see" properly--relationships, shapes, proportions, etc. 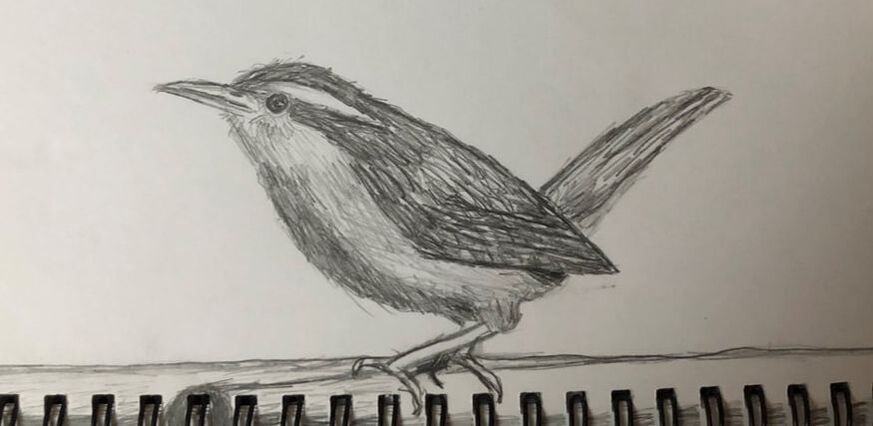 Carolina Wren
I was pleased enough with these drawings and started carrying art supplies with me. I soon invested in some quality colored pencils. There is a simplicity to the shape of a bird that makes it suitable to draw. And I find it amusing to recall that one of the first drawings I remember giving to someone was of birds from a big book of birds. It was a gift for my grandmother who always kept bird feeders. And here I am drawing birds now. Some birds turned out better than others. But with each bird I gained experience. I was finding photos of birds I liked online and then saving them to my phone to draw later.
Besides learning how to layer and blend colors, I was also learning about different kinds of bird feathers. I wasn't satisfied with just a white background though, and contemplated what I could do. I discovered small sized colored paper of archival quality that I believe is designed for a Cricket cutter/printer. I began with a pack of different shades of green.
Then I decided to try some blue paper for a pair of cardinals. The male I did mainly sitting on a hospital floor when my mother was dealing with acute appendicitis. But that's the point: these drawings are small enough that I can do them anywhere. It's very relaxing.
As an experiment, I had seen a photo of a swan diving. I liked the play of shadow and light on the water that comprised the splash and wanted to see if I could recreate it. Thus, here is a swan. I am pleased with the result. 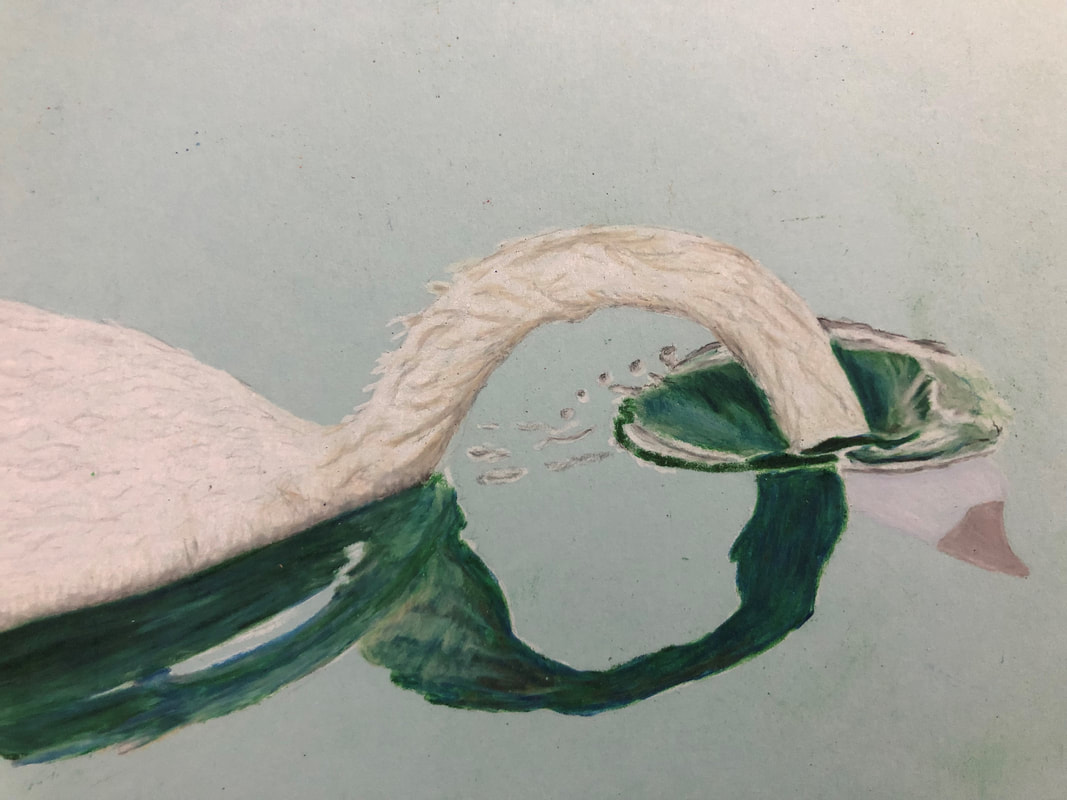 After the cardinals and swan, I wanted to go back to hummingbirds. Although some of my early birds were not local, I decided more recently to try focusing on birds that could show up at my feeder. Thus, while awaiting the return of black-chinned hummingbirds, I decided to try drawing a couple.
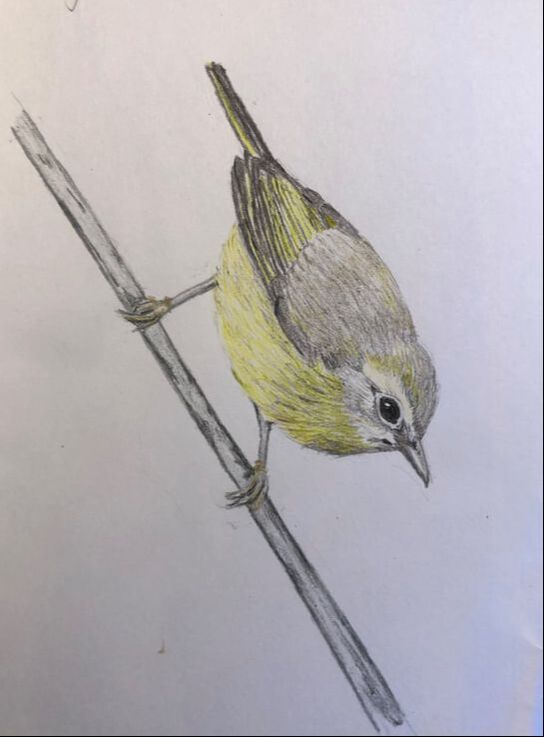
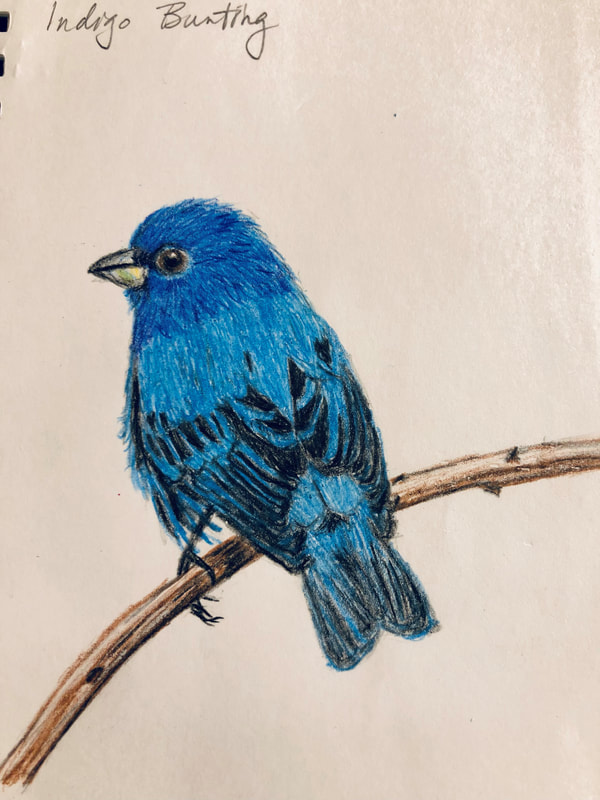
When I choose a photo to draw from, I am looking for something expressive in the face or body position. In fact, the first color that I put down after a base of white (so that the color will pop from the background and not combine with it) is on the face. I like the eyes and the balance of the beak as it flows into the facial features. The bodies still need work, but I'm getting there. And my most recent drawing, a Bewick's (pronounced like the car, Buick, I believe) wren, because I have one at my feeder. 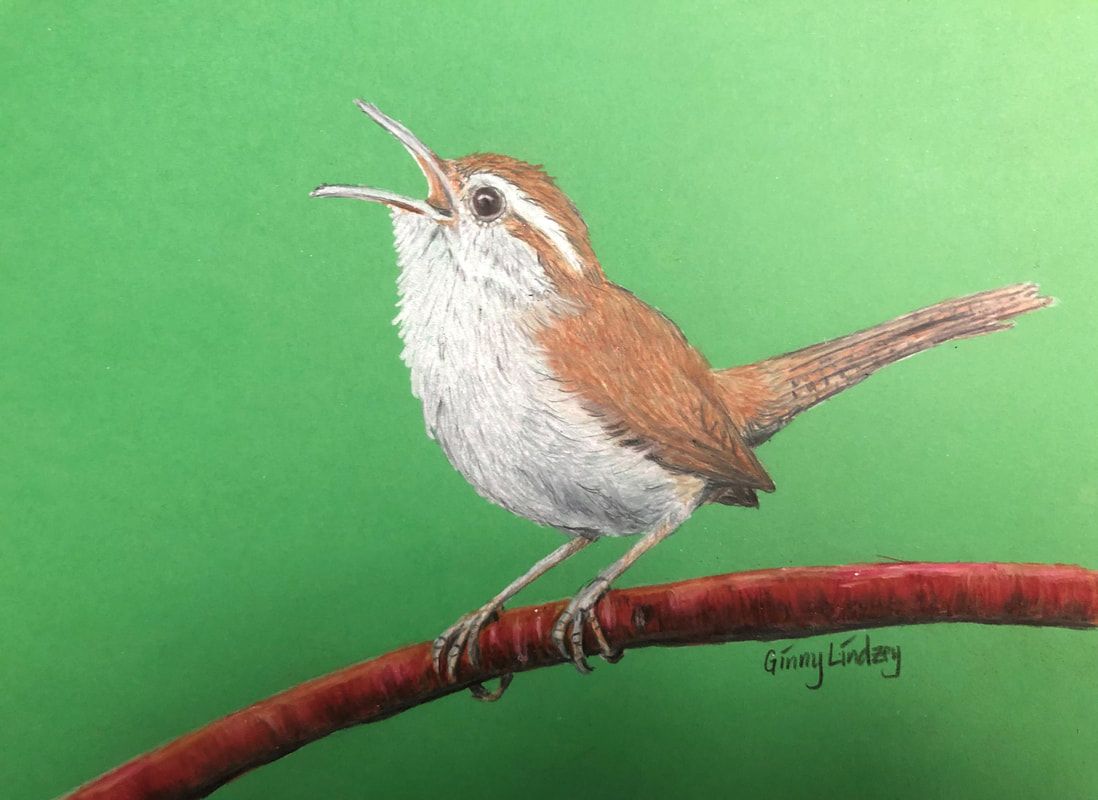 I'm very happy with this one. And I should think about what I'm drawing next but instead I think I will finish my taxes. Most of the birds on colored paper are now in frames and on my wall. Maybe when I get too many of them I will start selling them, but I really need to talk to a professional first to make sure I'm not doing anything wrong. For instance, I should probably use a fixative on these but have never used one. The frames I'm using are also pretty cheap but provide a clean, matted look. Oh, and I'm finally rounding a corner on my mosaic owl. I'm pretty sure I'm going to add more color to it--more leaves and branches--but the owl itself is done. It's not as good as I would like it to be, but much better than not being done at all. 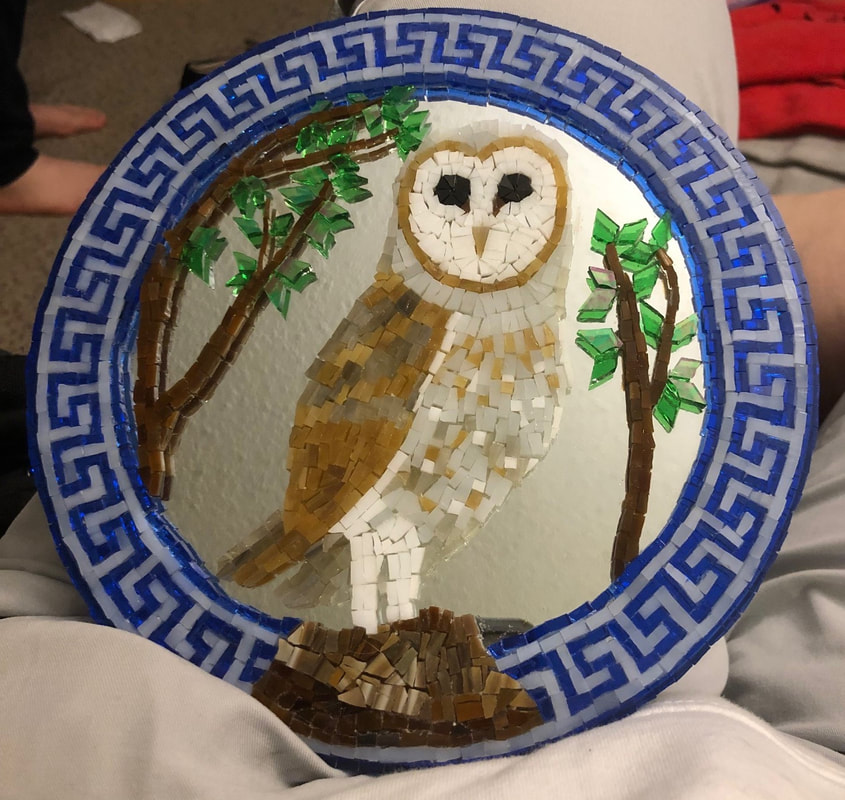 At the beginning of June I got a job at Wild Birds Unlimited in south Austin. The hours I used to put into working on my mosaics are now spent promoting birdseed and feeders. But I do have a mosaic under works... I hope to finish it by Christmas. I'm a little further along than this but this picture will do. 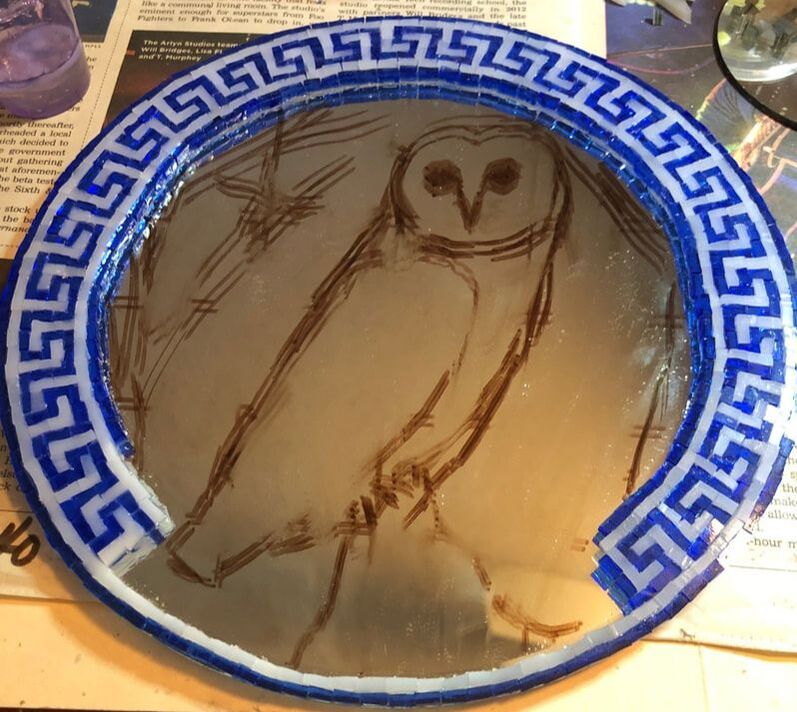 It will be a white barn owl. But in the meantime I have been applying my artistic skills elsewhere--that is, at work. When we got a black glass "community" board, I took over (and they happily let me). This is what's currently on it. 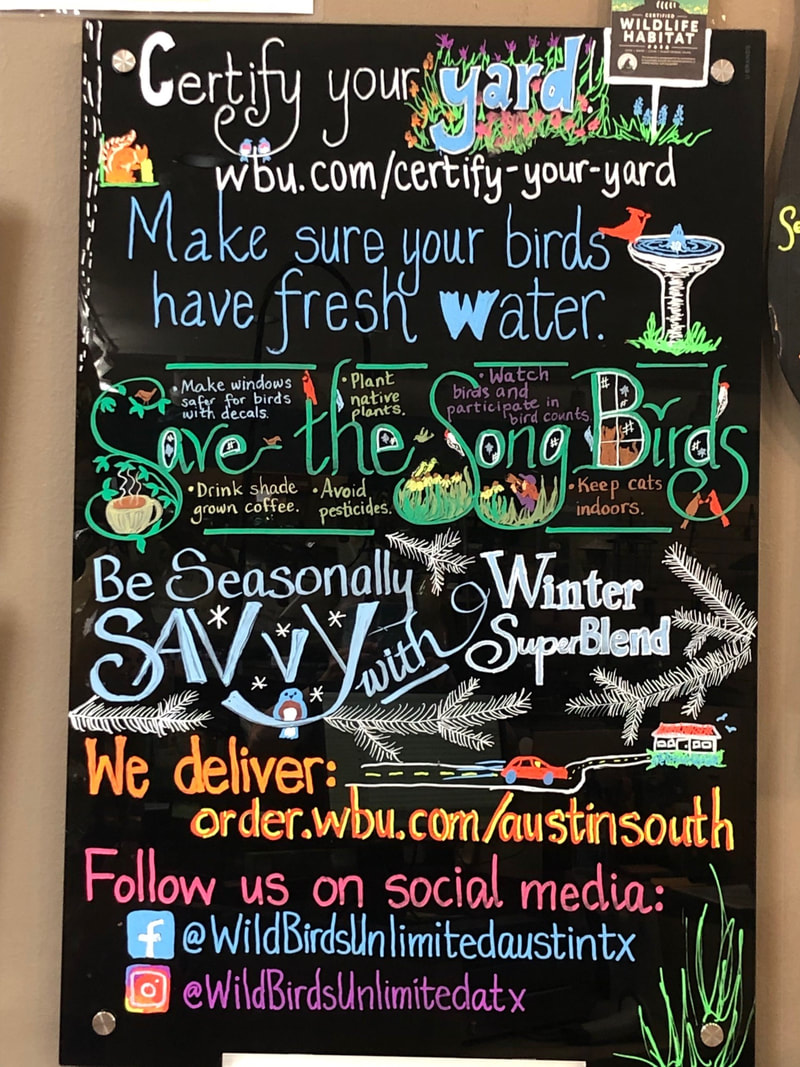 This is what it looked like in September. I've only been changing out sections, leaving some things the same:  I'm really enjoying using the chalk paint markers and keep looking for other surfaces to write on. Our binocular case was next.... 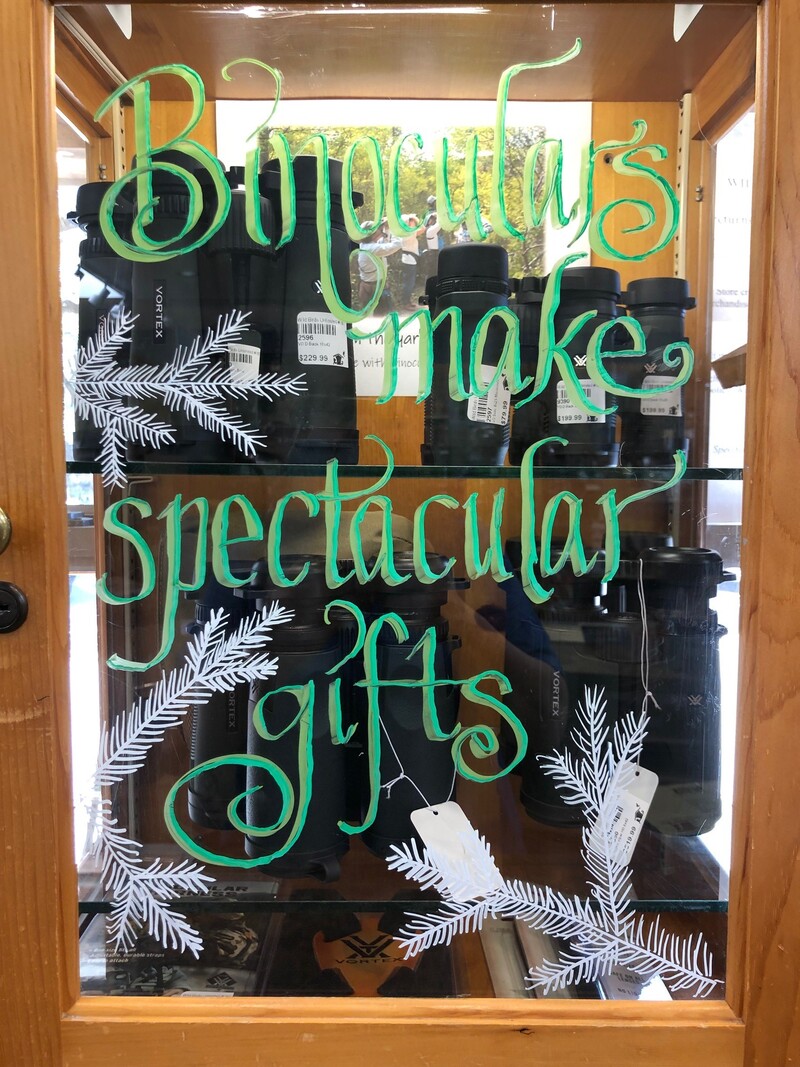 I ran out of space for new things on the black board so I put an old white board/bulletin board outside by our front door to add more timely news items: 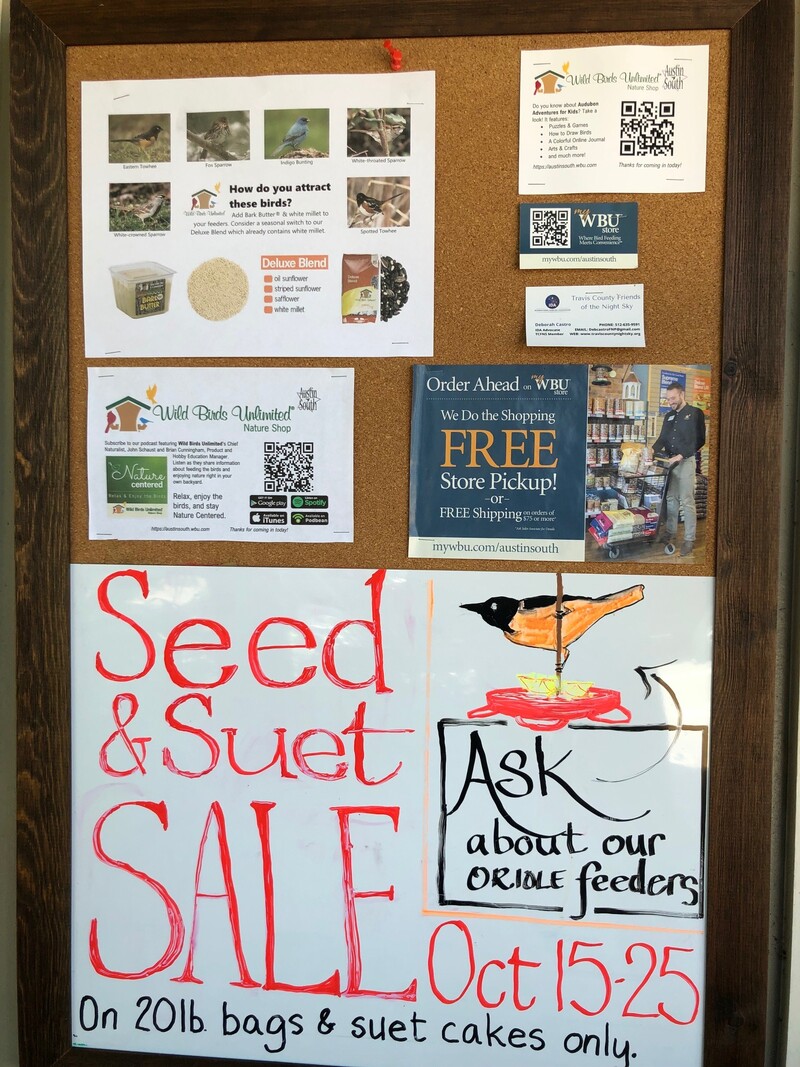 I've also been experimenting with designing some print/digital materials. At work I don't have access to the Adobe Creative Suite and I'm just creating things in MS Word, using a lot of work arounds that I have used as a teacher: 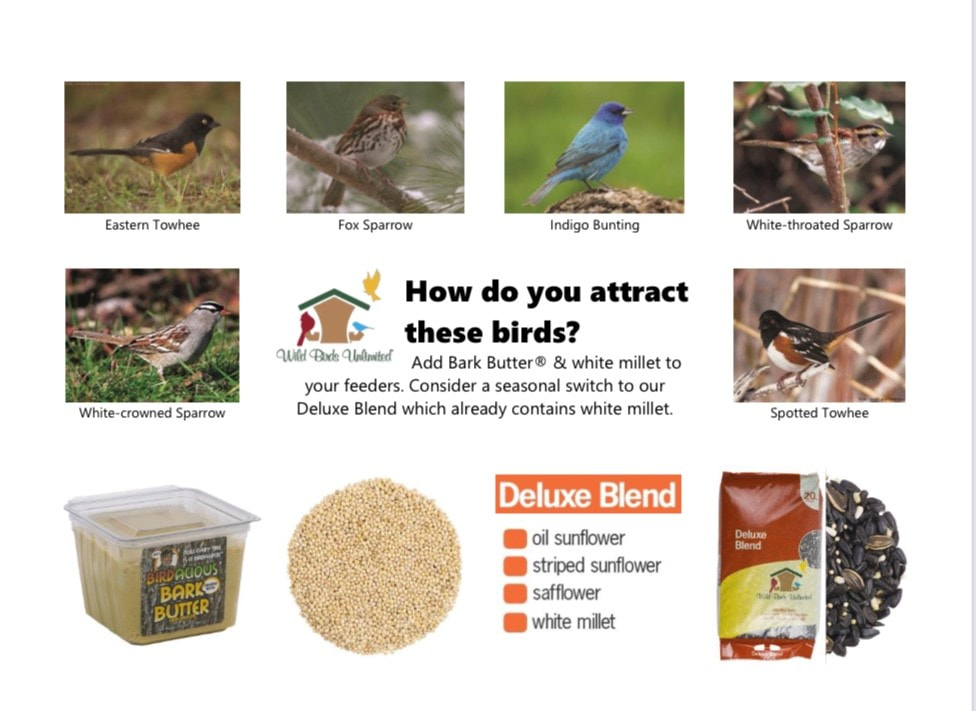 I'm enjoying thinking up and creating such things. It's nice to have an outlet for my artistic talents. And I'm learning lots about birds that I didn't know. Oh, I guess I should include yesterday's pumpkins. This year's hedgehog turned out quite nicely. 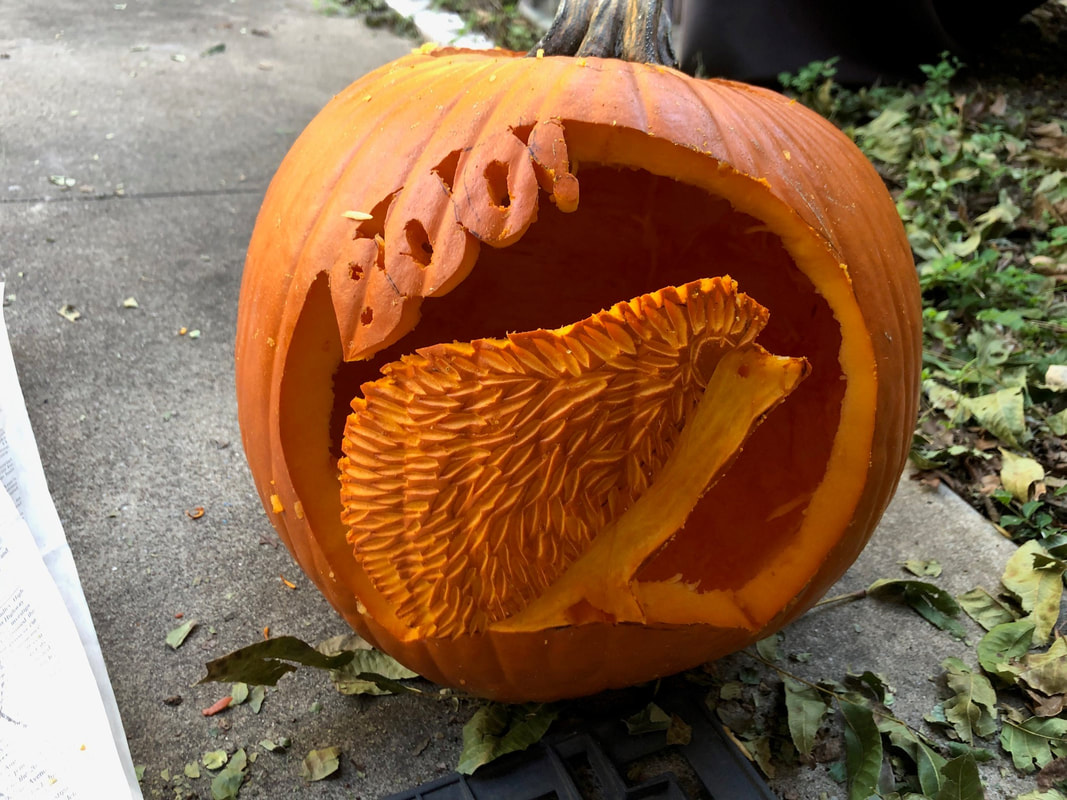 I didn't get a picture of it lit up because I discovered we were out of candles. I did a simple Jack O'Lantern after the more complicated hedgehog: 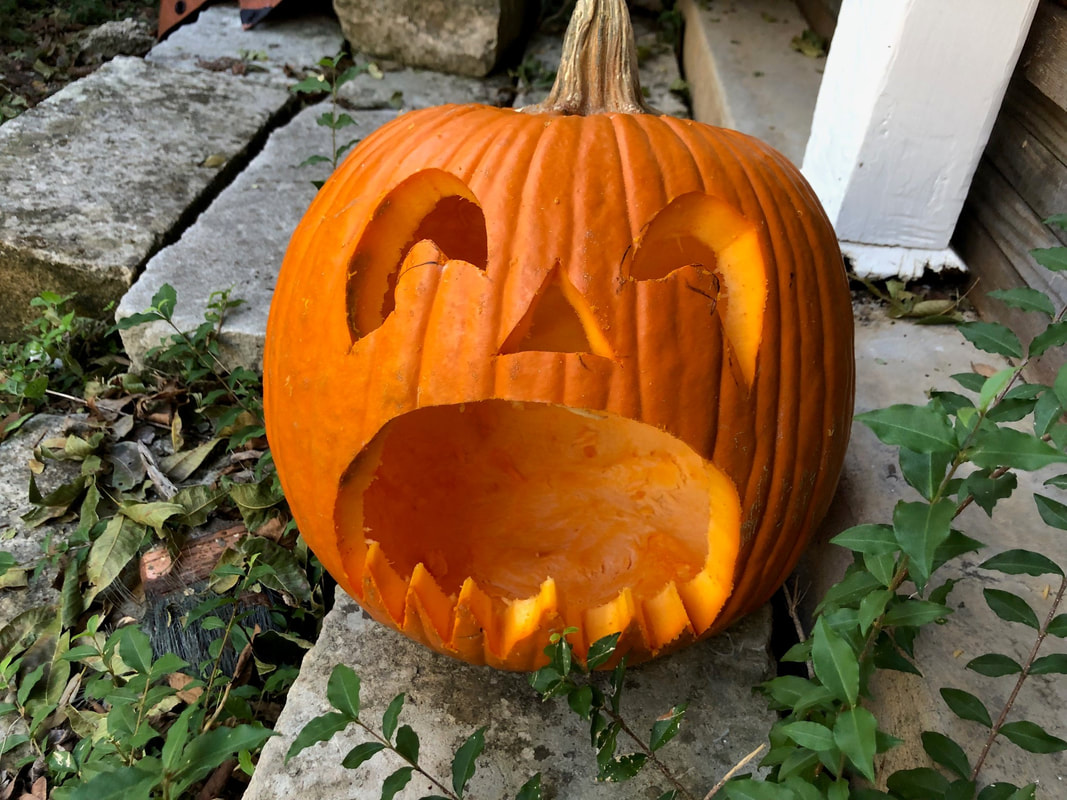 I've also been working madly on a presentation for the Texas Classical Association, which is next weekend. I guess it has been sucking a lot of my time up as well as work. That presentation and materials will be available in the RES SCHOLASTICAE section.
I spent most of April debating what I wanted to create next. To kill time I decided to cut glass and make borders on future ornaments. I ended up with a dozen, trying different color combinations, before I decided upon a cardinal for the next real project. 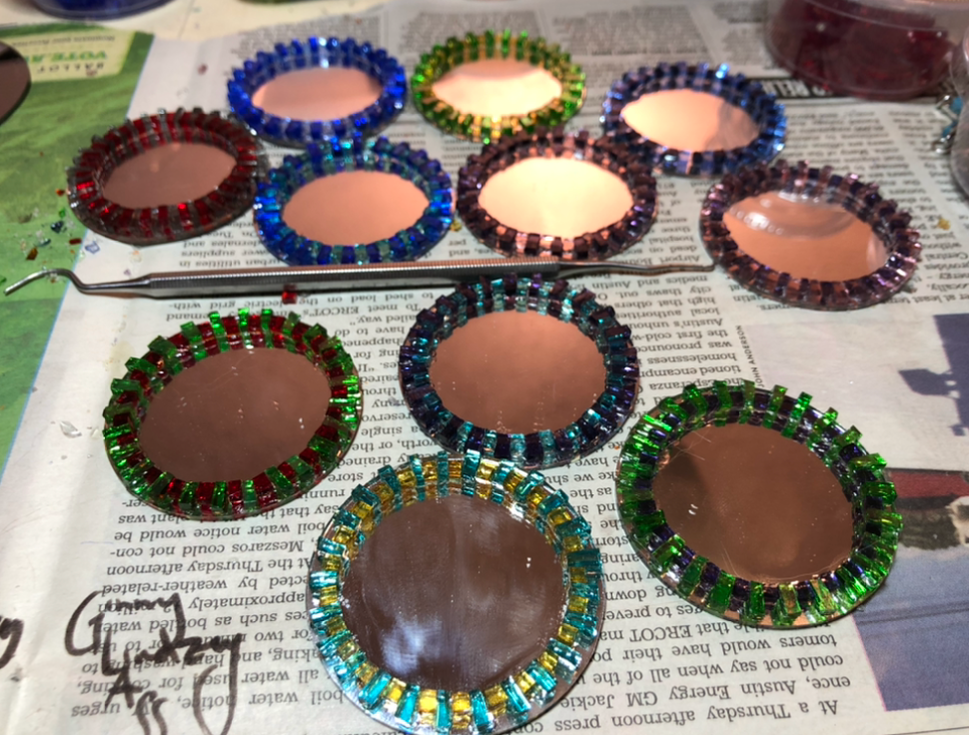 It took me a while to find a photo of a cardinal that I liked. This cardinal is for a friend who always shared photos of cardinal in the snow at her feeder in Michigan. While this photo doesn't show a cardinal at a feeder, I did think it was lovely and doable for my skill level. 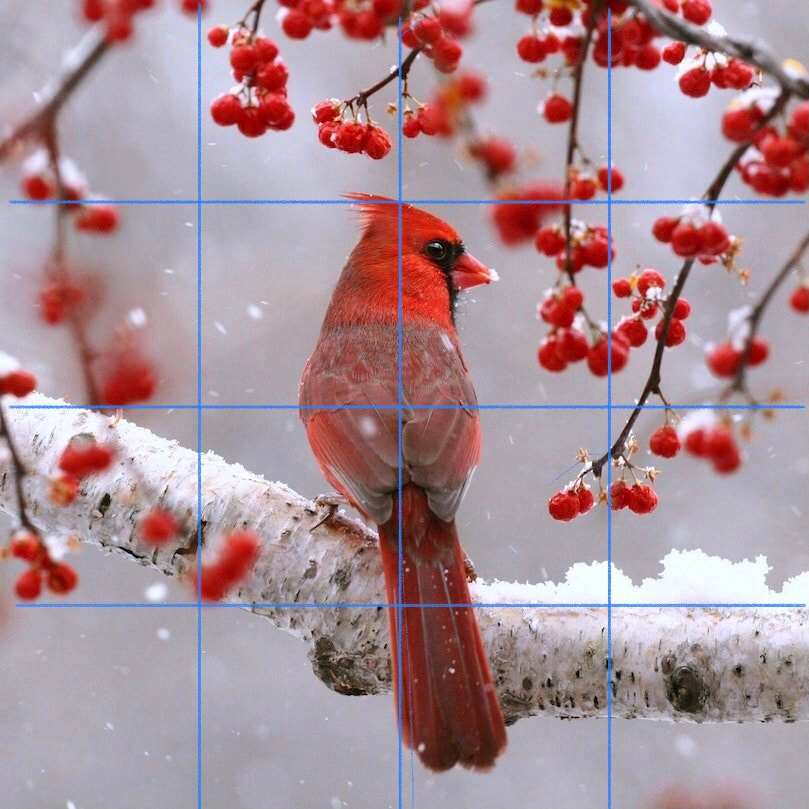 I sketched out the design on a small mirror. I know at some point I need to work with larger mosaics but working small costs less. 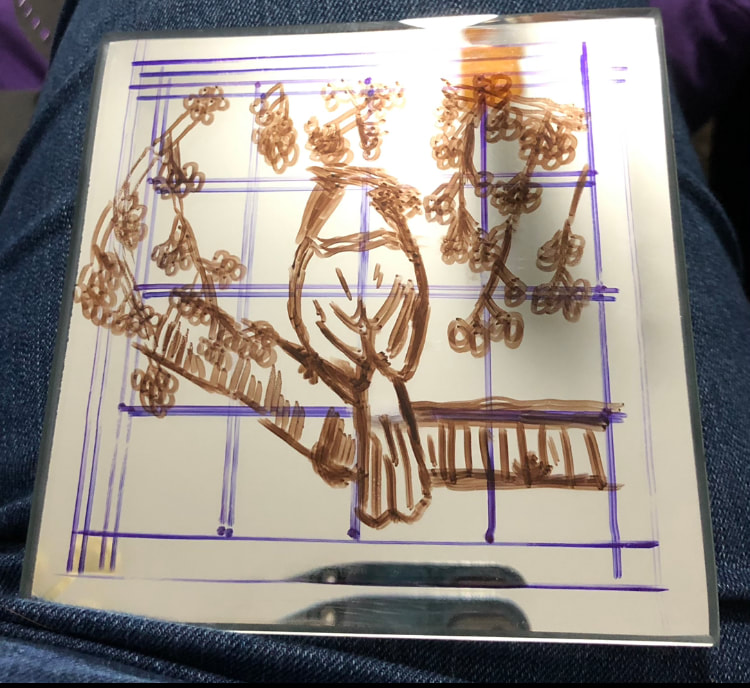 Soon I was cutting glass, which is always soothing to do in its own way.
Then I played around with a color check. 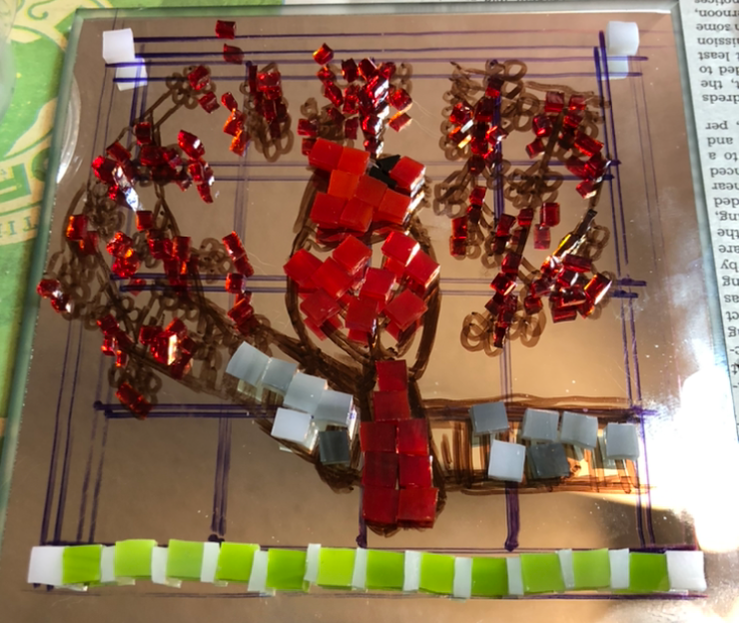 Time to start gluing. I may not have mentioned before but I use Mac Glue, which has been in short supply during Covid. But I have enough to last for a while. Once the border was completed, I couldn't help adding a few of the thin branches with berries. Then I began the big branch. I feel guilty because I honestly don't know what kind of tree has these berries in winter and usually I research such things, but I didn't this time. What I did know was that I wanted the transparent glass for the berries, opaque for the cardinal. (This is similar to what I did in my owl mosaic with the leaves being in transparent glass.) 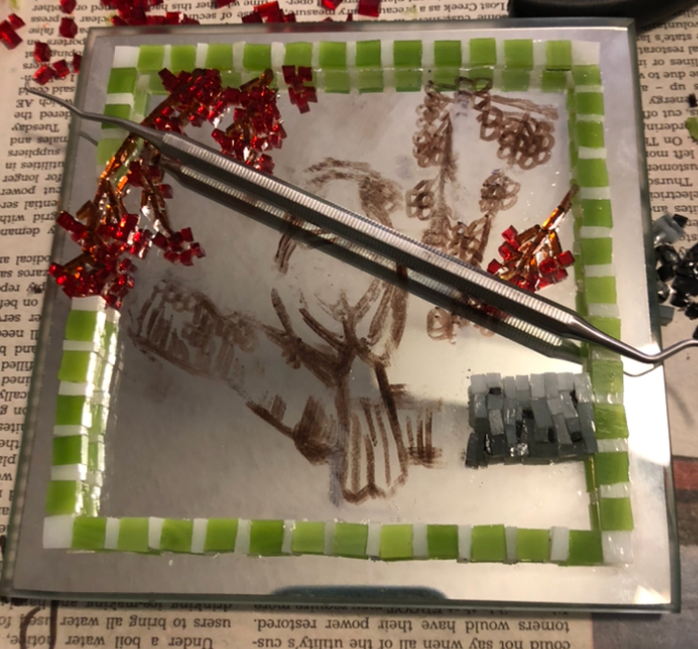 I had originally intended to make the wings darker but I was unhappy with the look. I settled on just some edges on the feathers. I'm not entirely happy with the wings, but overall in the end I thought it was enough. However, it was about this point that I decided that the cardinal needed to face the other direction. 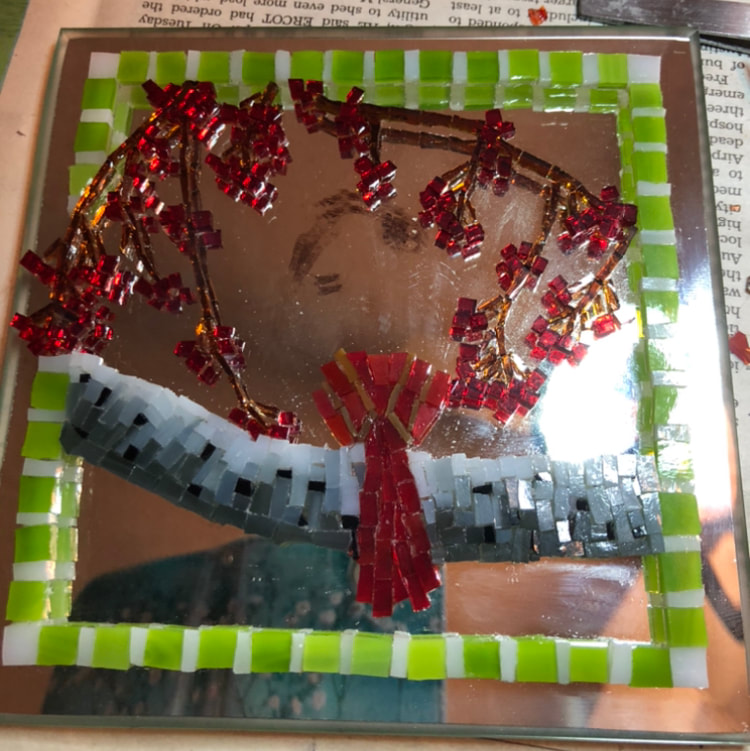 In the end I think the cardinal facing the other way turned out fine. I had toyed with adding a few white tesserae for snow, but thought it looked better without. 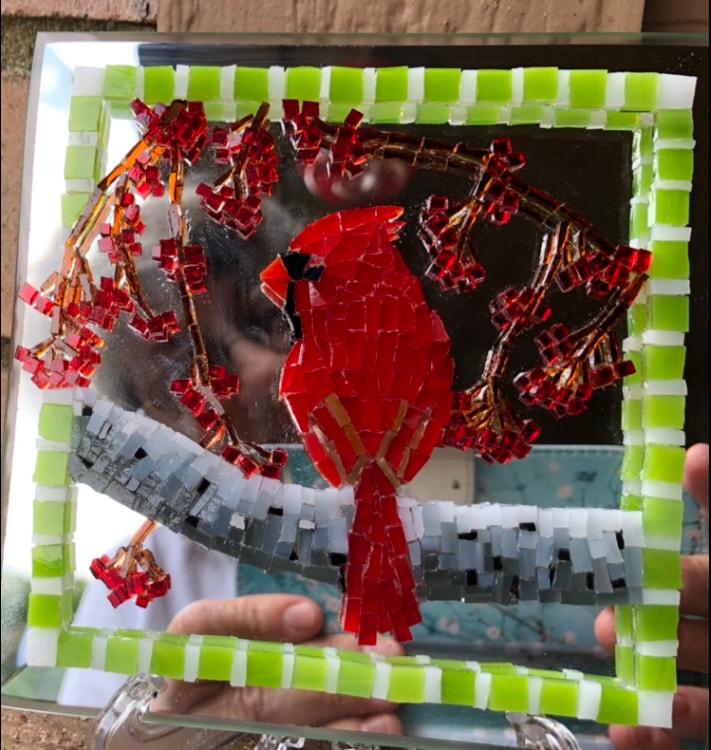 Even one of my cats approved. Can you see her in the reflection? 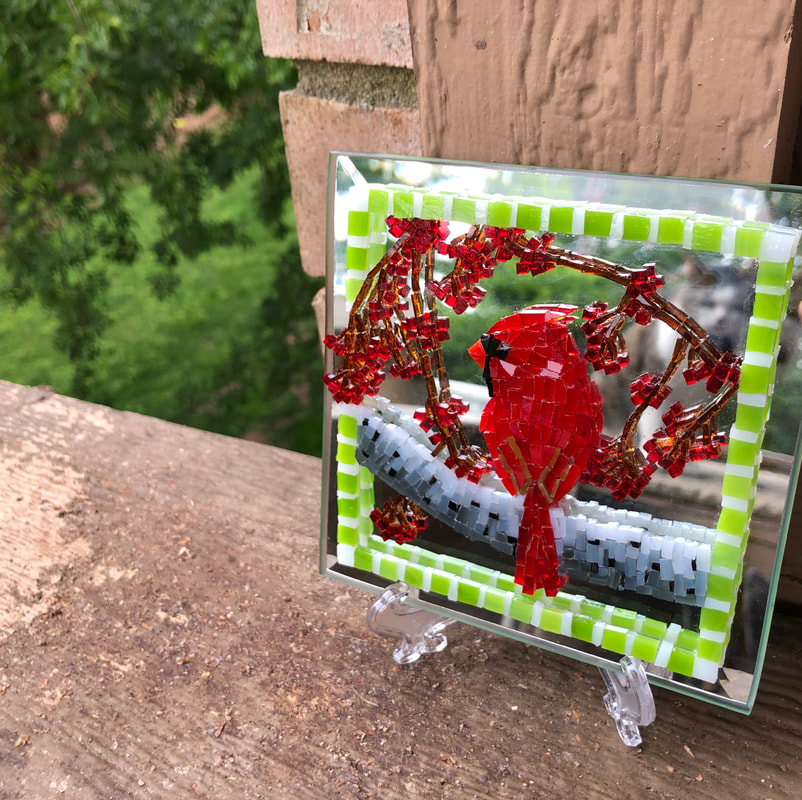 I have been putting on the back of the mirrors/mosaics how many hours went into the work. This one was about 30 hours. I'm not sure what project will be next. I guess I can always work on ornaments in the meantime.
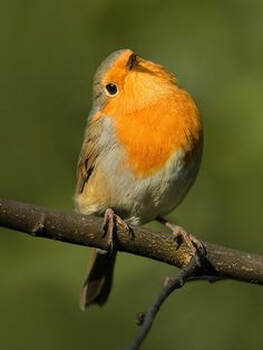
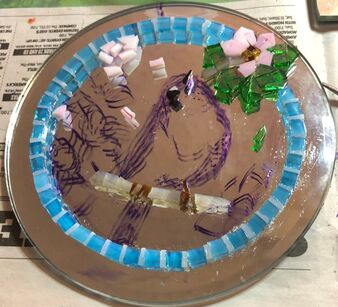
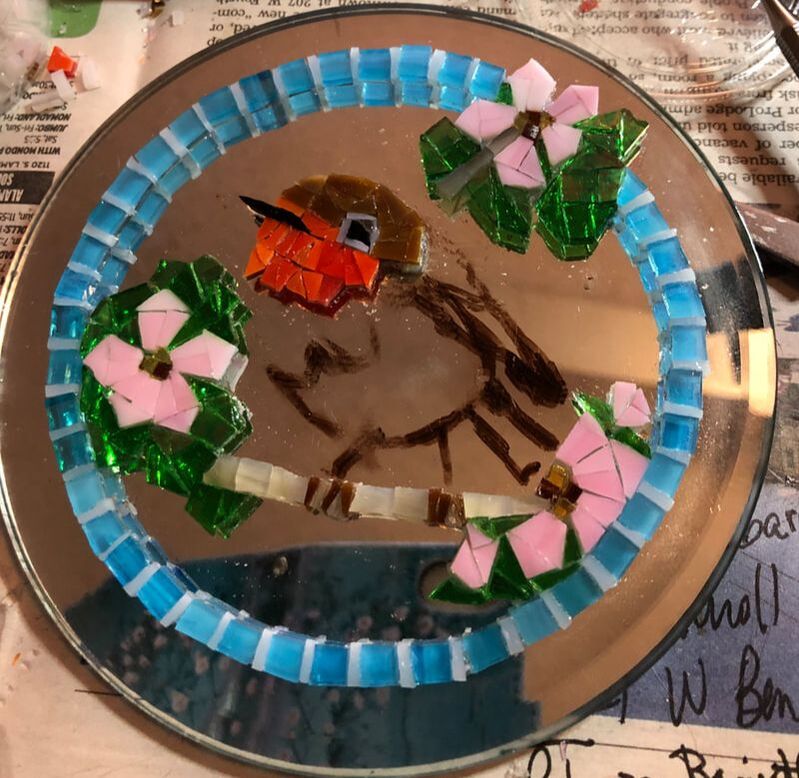
I have an English friend who always sends Christmas cards with robins--English robins, not our bigger, less adorable American robin. I wanted to make a mosaic for her and thus picking an English robin seemed right. So I started looking at photos of robins.
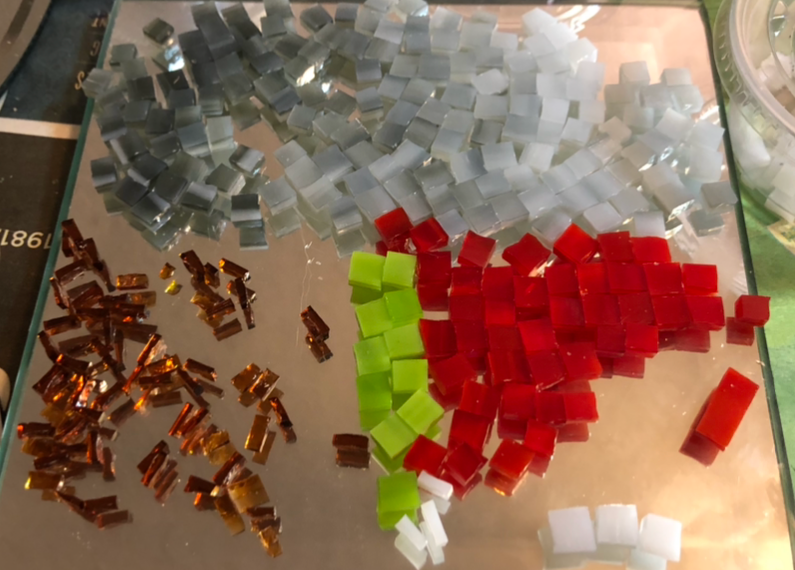
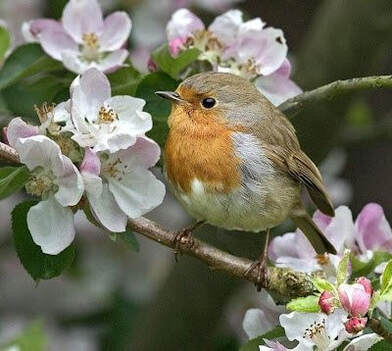
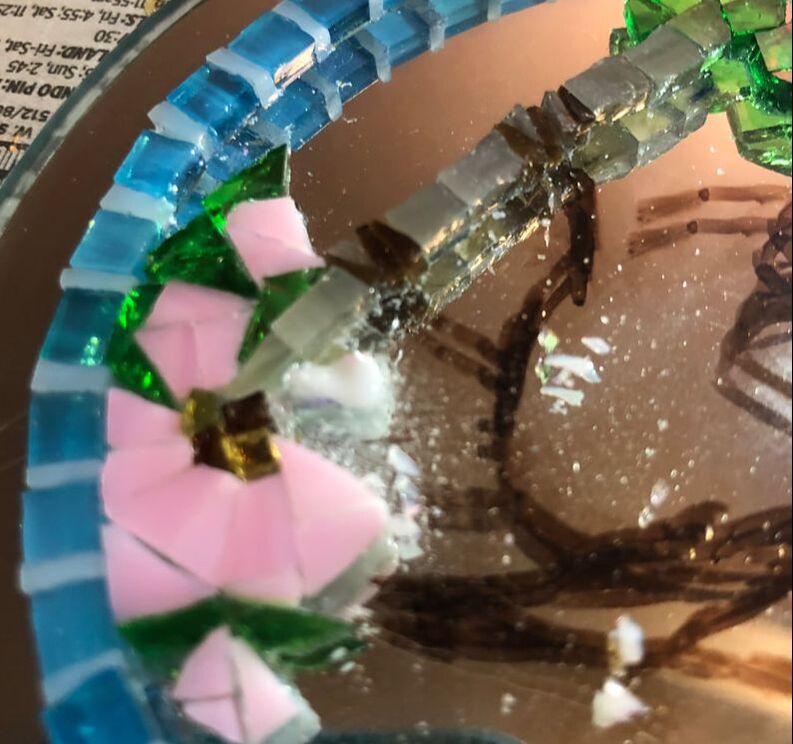
I liked the cheekiness of the robin with the cocked head, but wanted the flowers that appear in the second photo. I decided to combine both in my sketch. 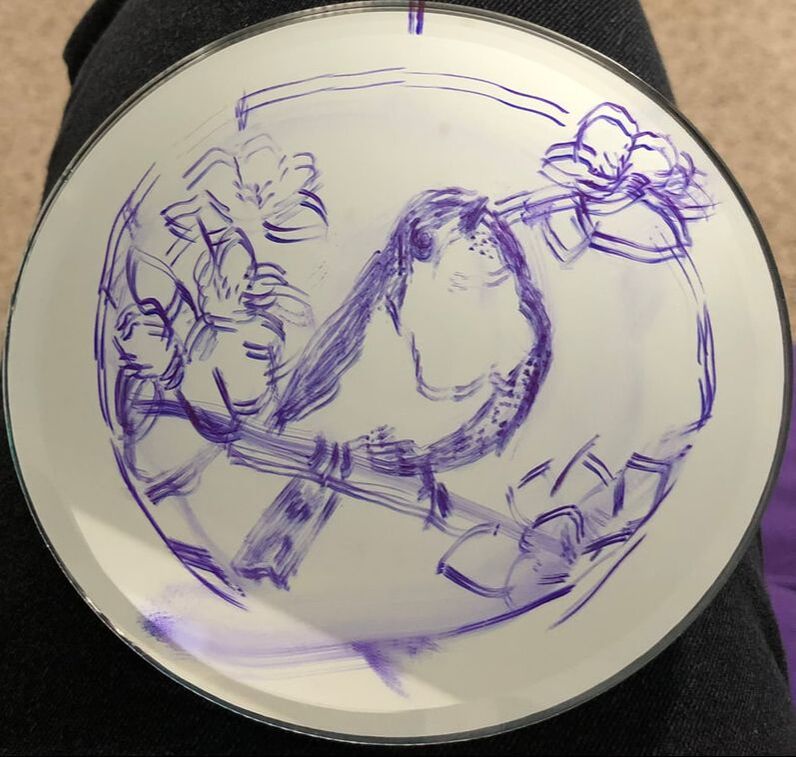 I thought this should work fine and thus turned my attention to cutting the new red glass which I had bought. 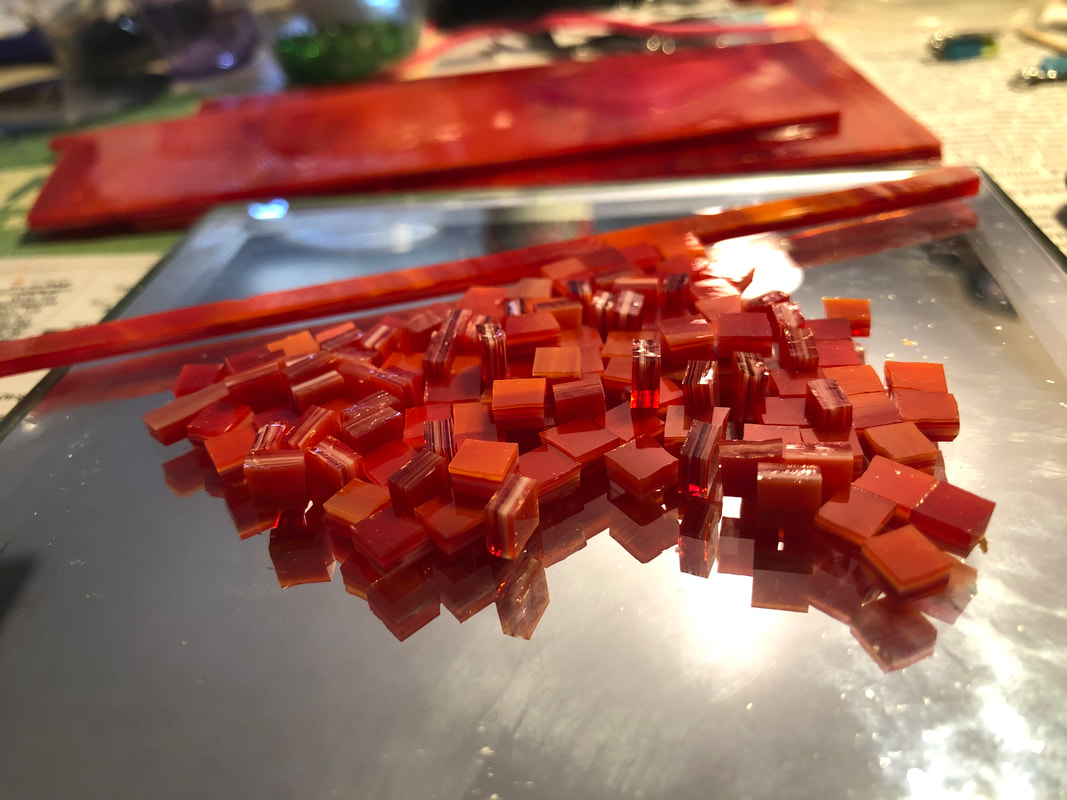 I liked that this red was really a mix of red and orange as well as other shades in between. That would be important for getting the colors right on the little robin redbreast. 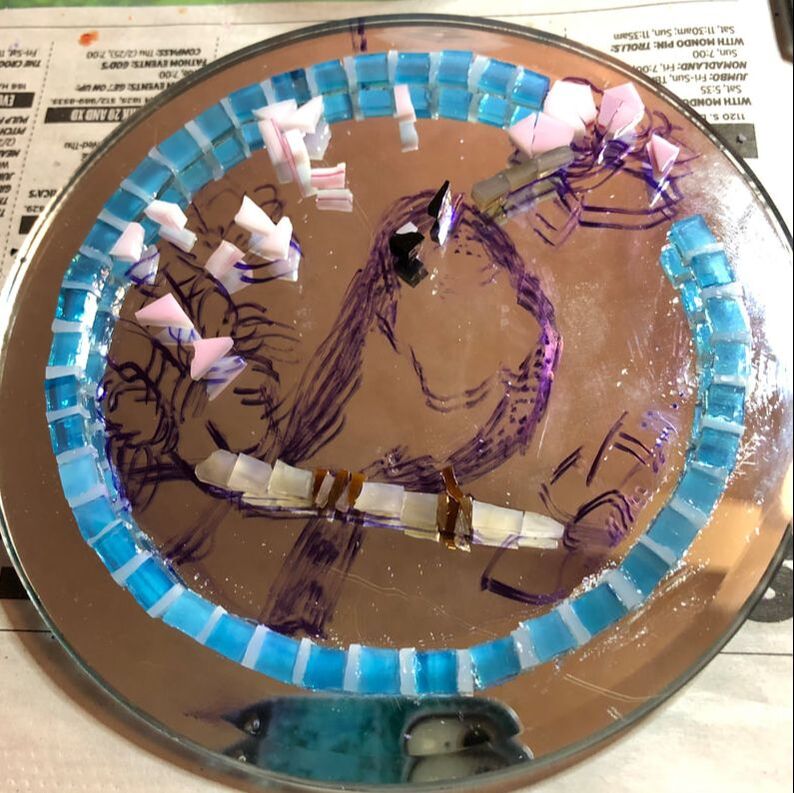 For the border I settled on light blue and white to represent the sky. I left an opening at the top right to have the flowers break through the frame.
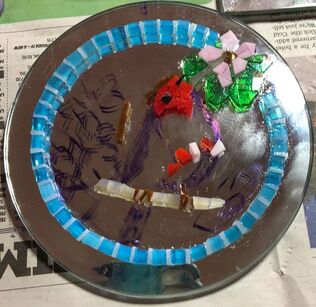
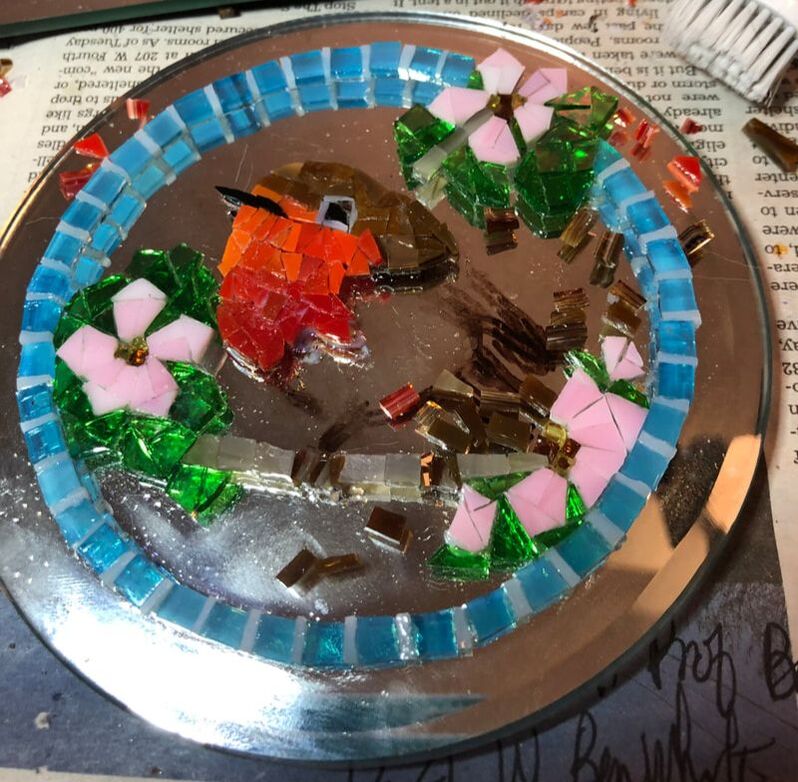
I decided to put in that first flower in the gap, followed by beginning the head. I confess in my eagerness to just get on with it I had forgotten that I was going to sort out my different shades of red to make the coloring look more realistic. But more on that in a moment. 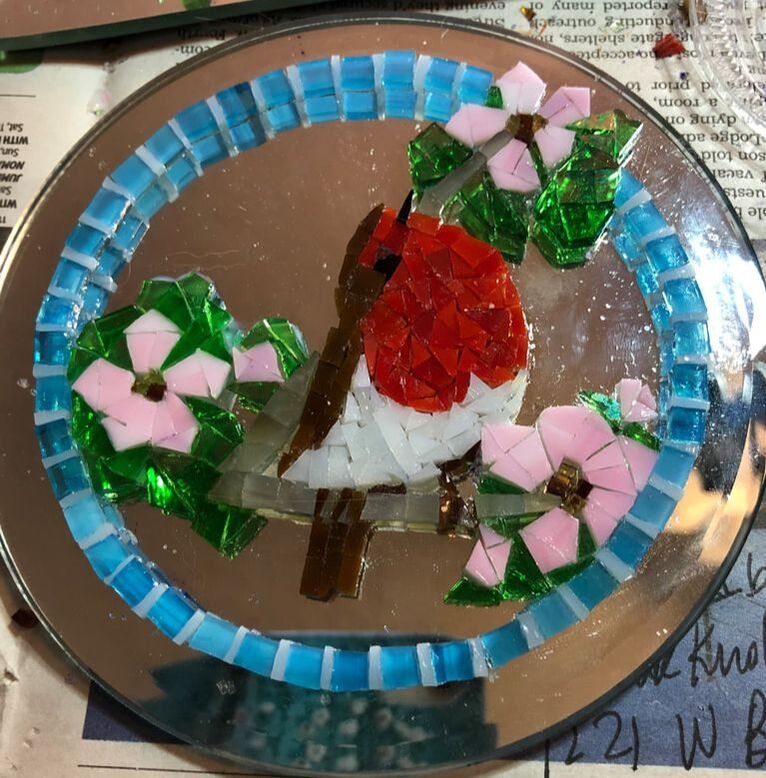 Once I finished the robin and added a couple more flowers and buds, I decided I didn't like him. It was flat looking and didn't look like feathers. Unless you knew where the face was it was difficult to see. The shading was all wrong (or absent). Plus he no longer seemed centered but more on the right hand portion of the mosaic. I had some choices. I could scrap it altogether, or I could just remove this robin and redraw/recenter it.
In the Roman world there is a process for removing a leader who has fallen out of favor from public monuments: damnatio memoriae. A person's image or his name (or both) would be removed -- totally chipped away. And thus I removed this robin and even some of the flower. The glue that I use, Mac Glue (a craft glue), had fully set and I was amused to see that some of the glass broke instead of the glue giving way. Eventually I got everything cleared off.
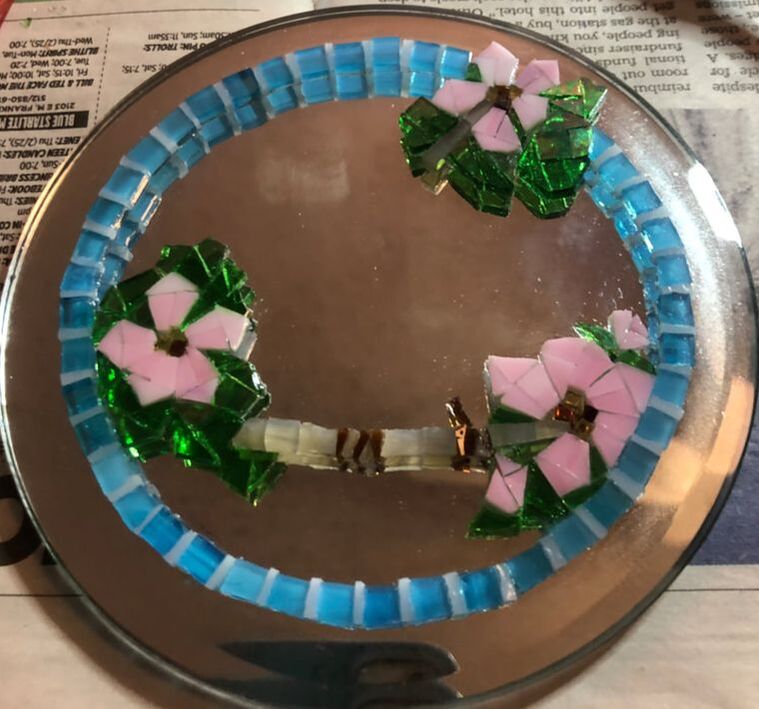
I decided to draw the other robin because I thought he would fill the space in a more balanced way. I was mindful of the shades of red and orange for his face and chest, making myself redo any section that wasn't fitting together quite right.  I'm still not 100% satisfied with my robin, but the coloring and shading is better, and the balance of the piece is definitely improved. I added more greenery and pink blossoms, petals, & buds. 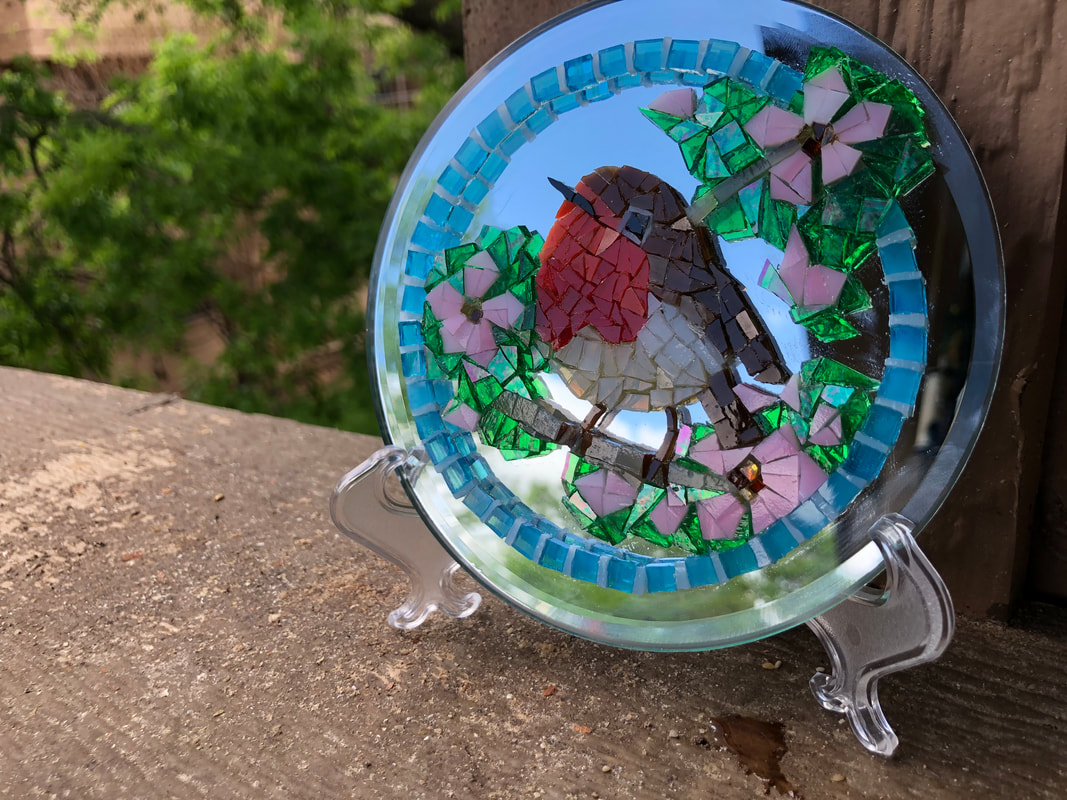 I do think he is lovely in the sun and I am pleased that I never gave up on him.
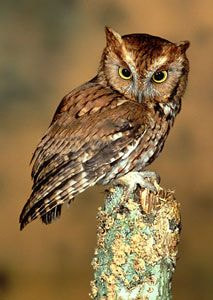
I turned to owls next, screech owls, because I wanted to make a gift for a friend who discovered owls in his tree a few years ago after a storm split the tree in half. It took me a while to find some pictures to inspire my design. I relied on these two the most.
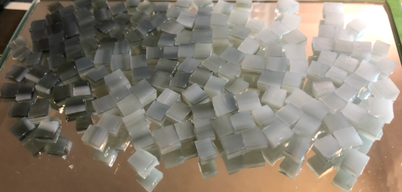
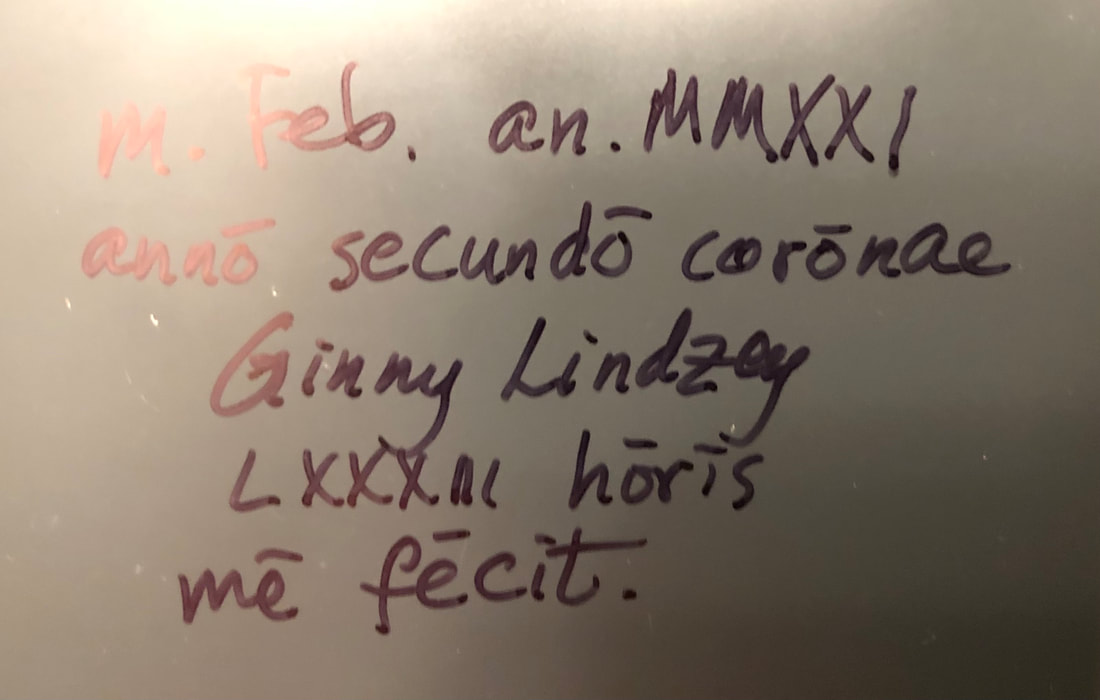
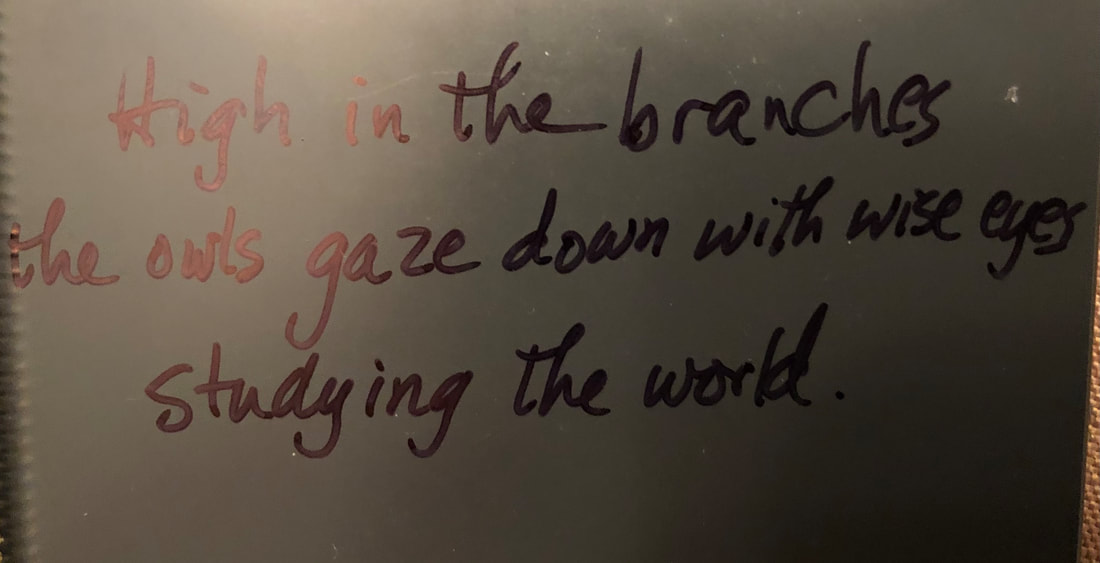
I sketched out a design and began cutting glass. My preference is to cut centimeter strips which I then snip into centimeter squares and further into four more squares. But I also cut half centimeter strips, as you can see here. 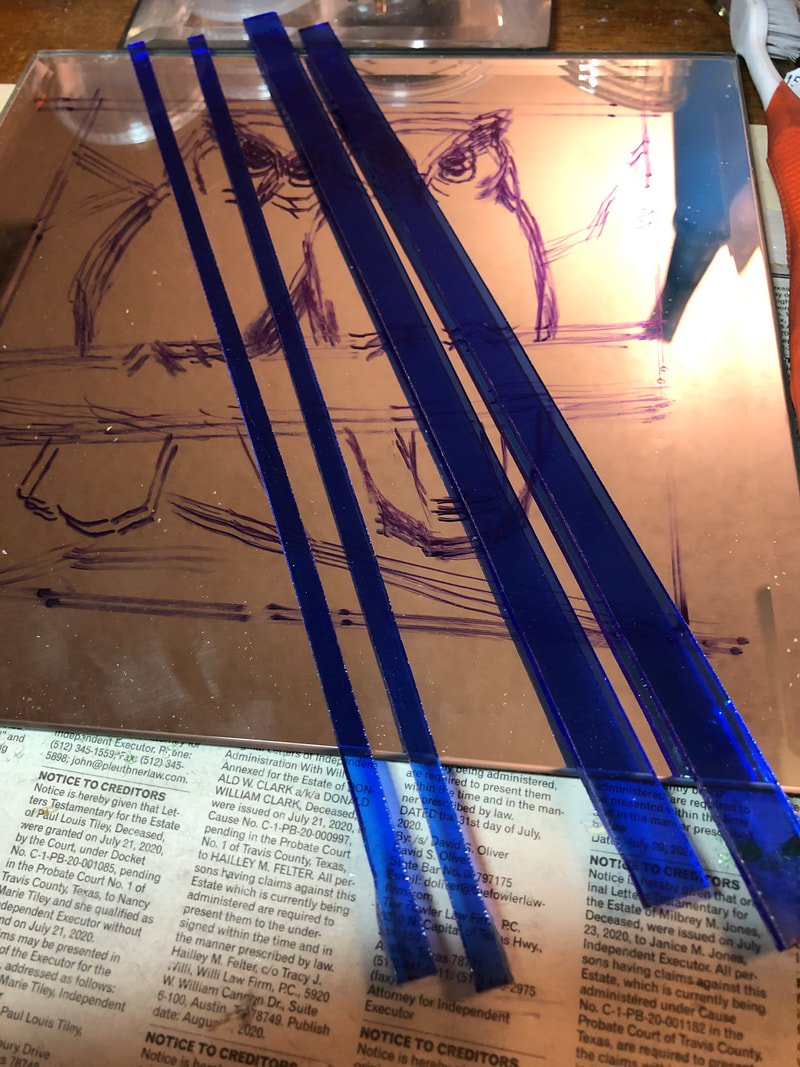 For the branches, I cut glass from a sheet that had a range of colors which would help with shading and texture.  I also had a brown sheet of glass with many shades which would work for the feathers, along with some white. I try to cut up as much glass as I can before I begin the design itself because it does save time. 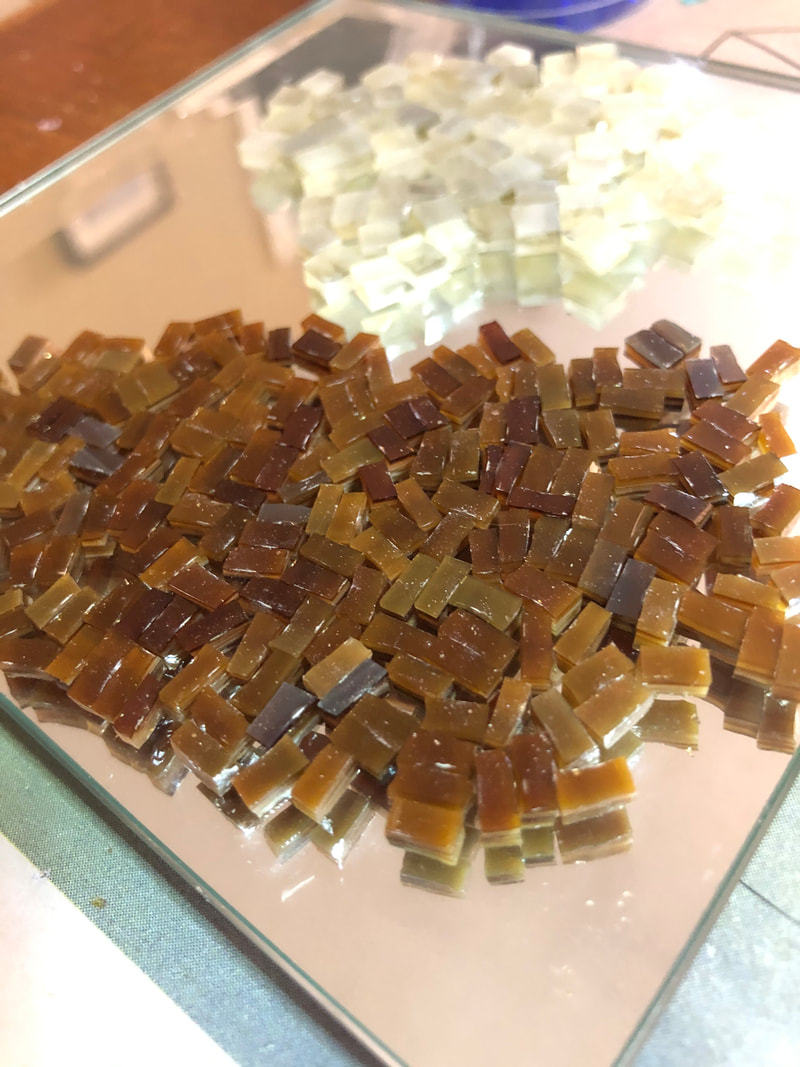 I decided to cut the leaves in a particular diamond shape. I made a point of making different sizes. Eventually towards the end of the project I also cut some little yellow leaves to add interest. Here I am just getting an idea of what the leaves will look like when in place. 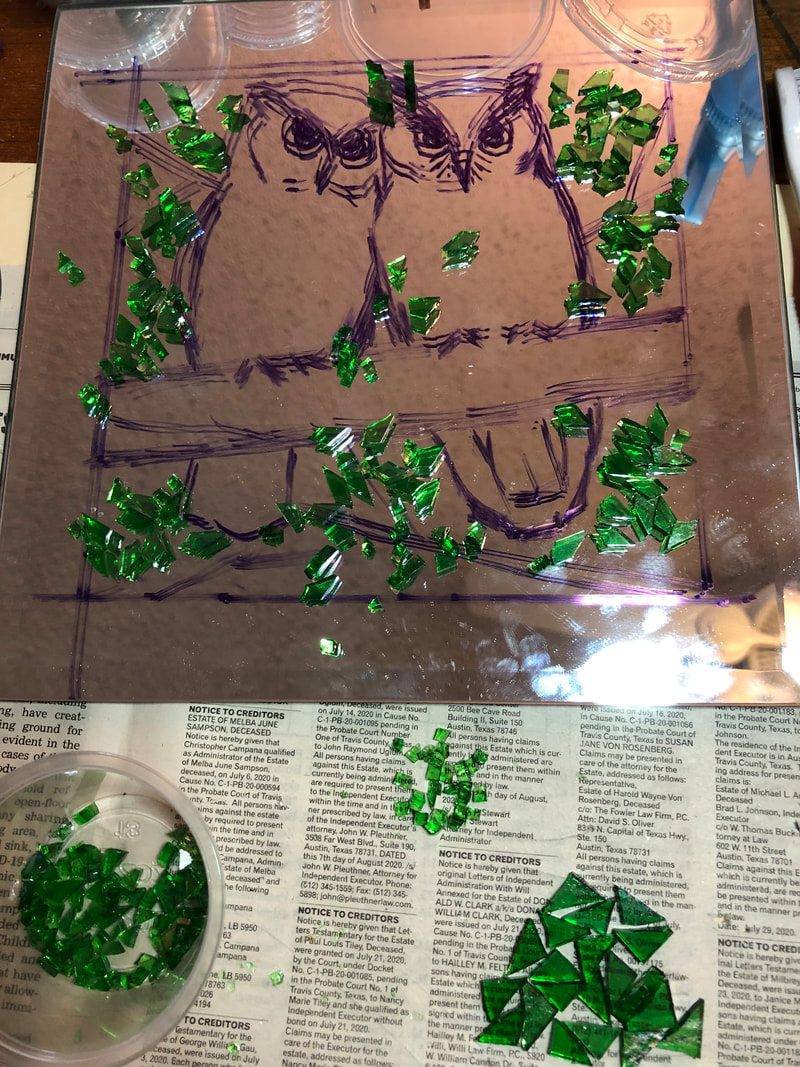 After cutting the glass, especially glass for a specific purpose like the yellow glass for the eyes, I put them in little cups and labeled the lids. 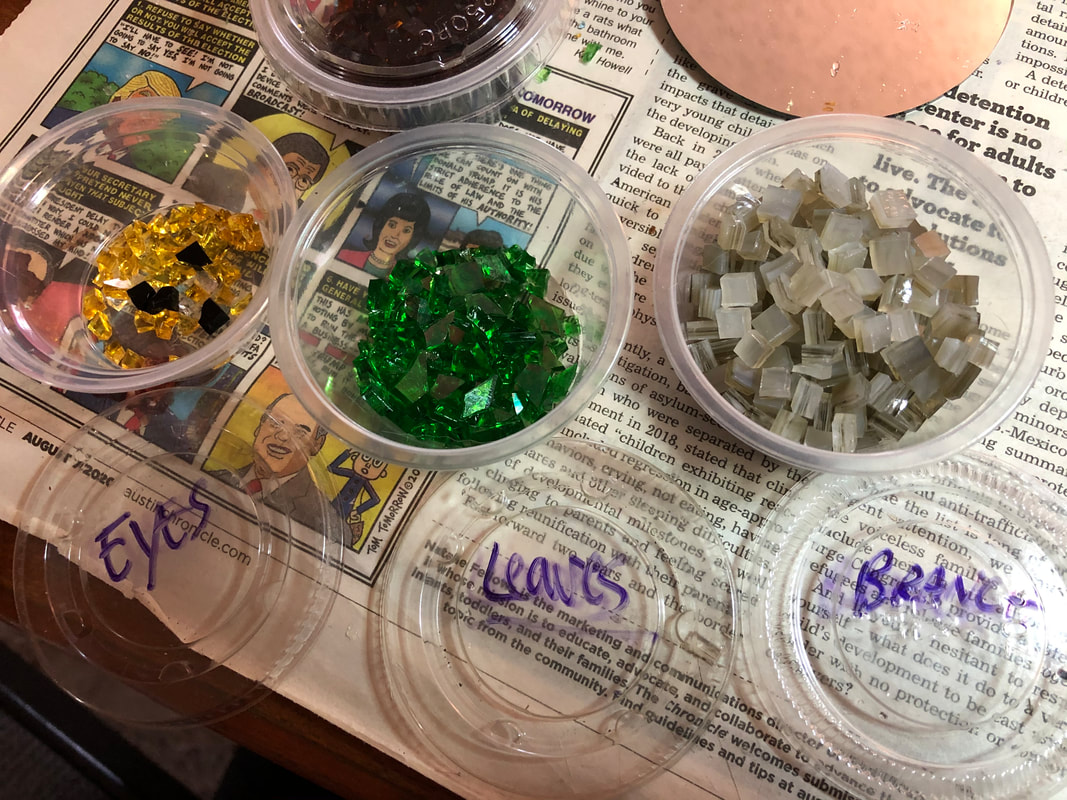 I began with the border, determined to keep those lines of glass as straight as possible. 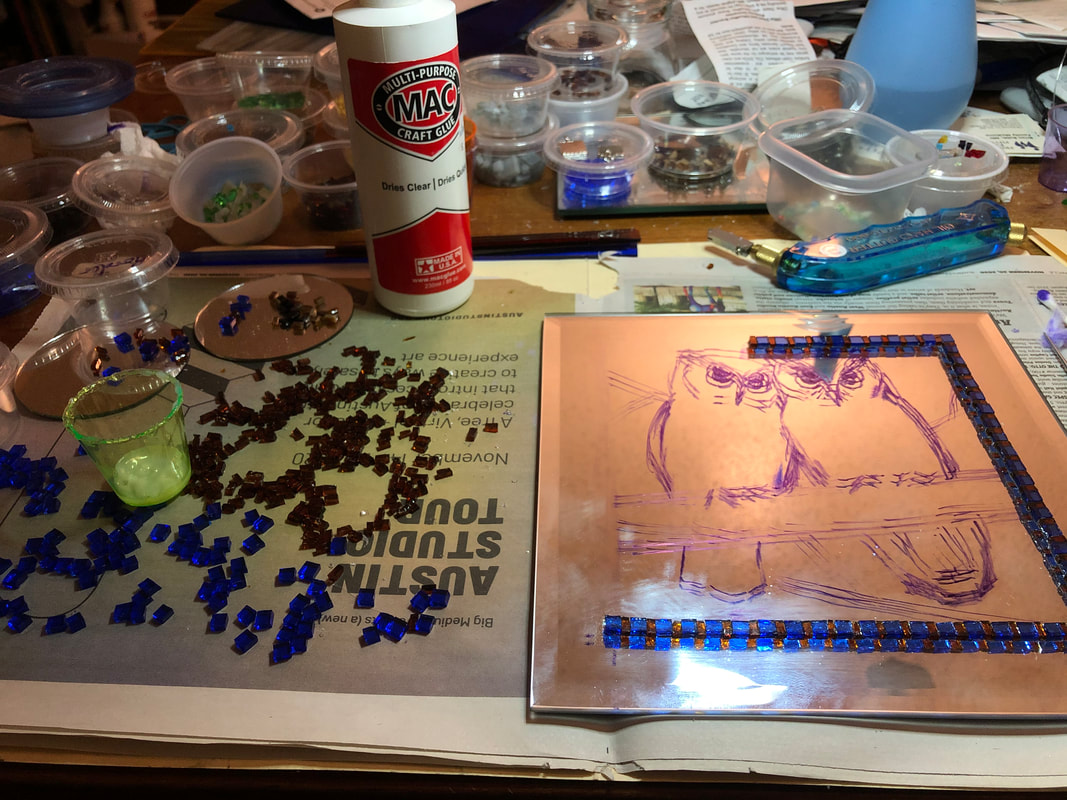 I left an opening in the corner so that I could have a leafy branch break through the boundary of the border. Ironically, I accidentally used a different grey glass (that didn't look as natural) and I actually had to remove this branch and replace it with the more natural grey. But I was just excited about getting some of the leaves placed. 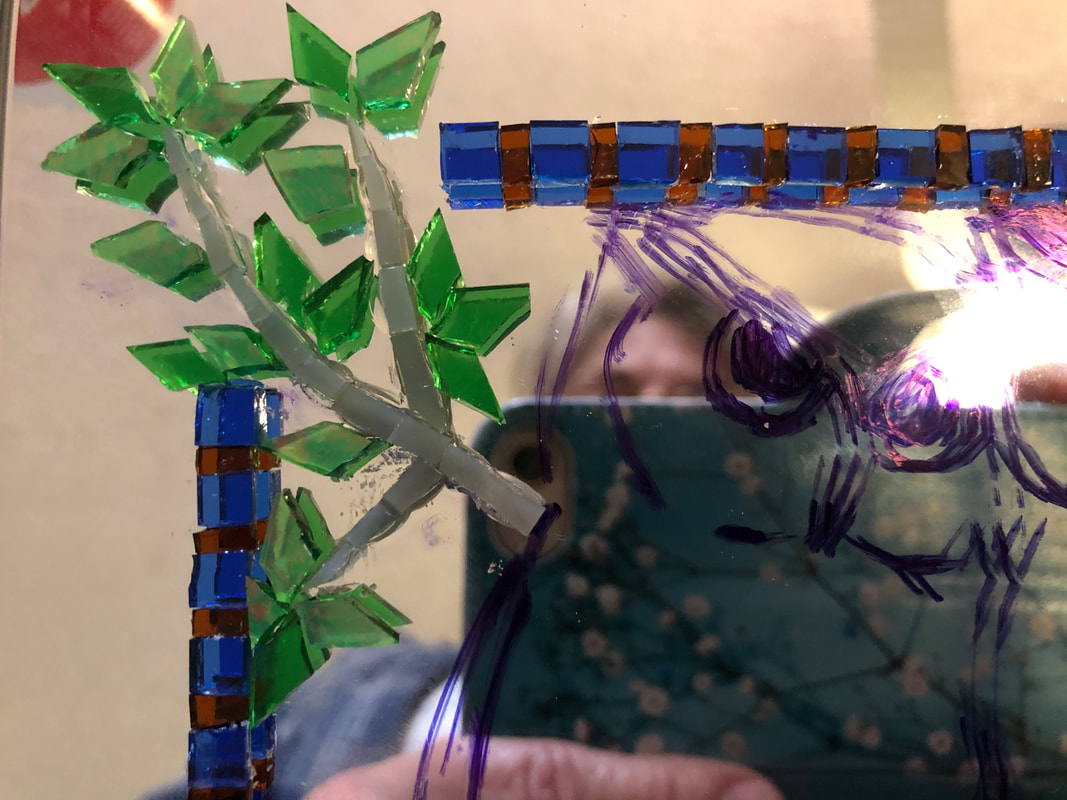 I tackled the big branch next and was pleased with how the colors worked out. 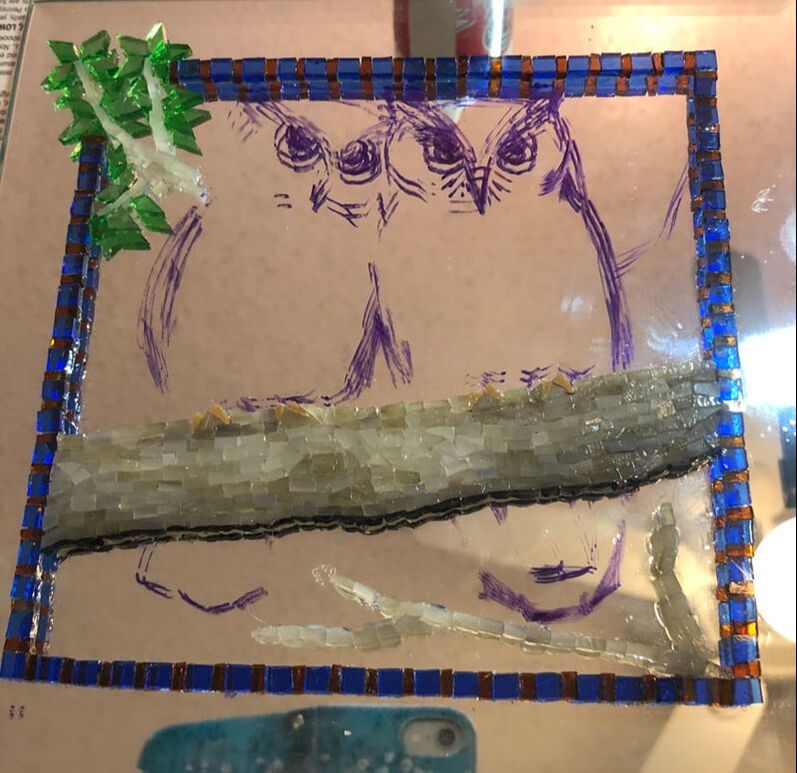 I really wanted to play with the leaves more--I really liked all of that green--but knew I needed to do the tails next and work the branches and leaves around them. I dared another set of branches on the right, but knew it was time to tackle the owl faces. 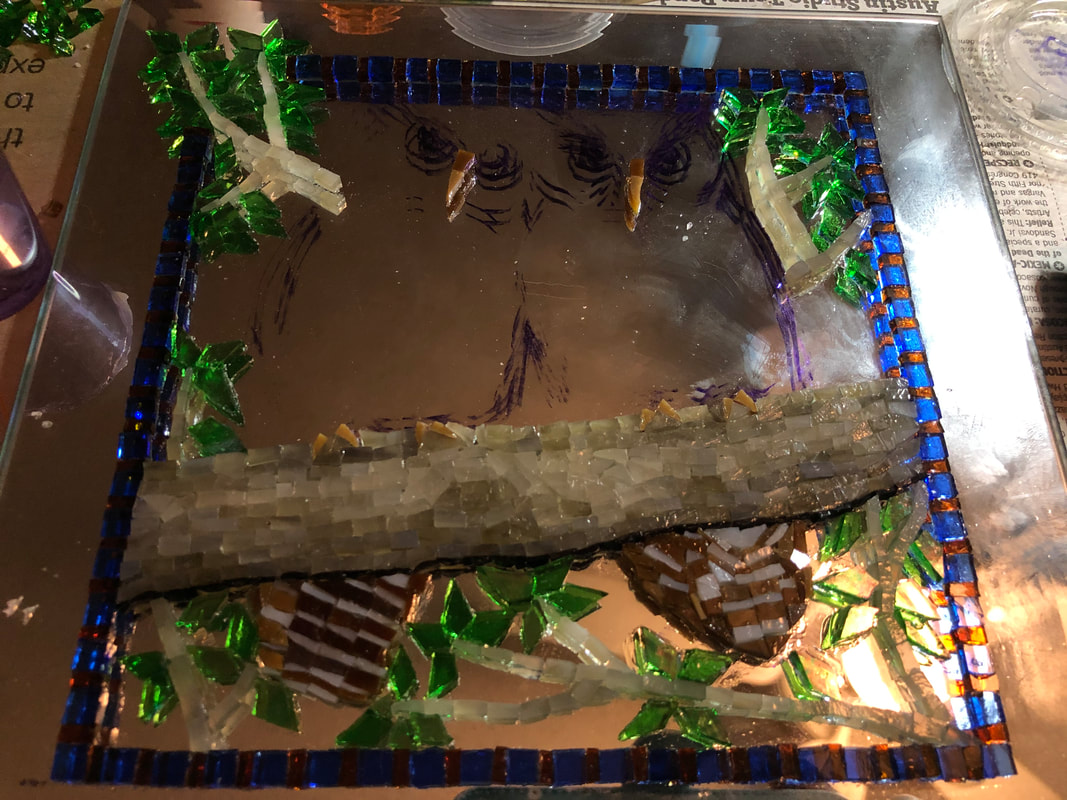 The eyes had to be right or this mosaic would not work. All the dried and drying glue makes this look rough, but I feel I was able to capture the piercing glare. You can see where I am erasing the lines of the design as I work. (I often thing how nice it would be to work on just glass and have the pattern/drawing underneath the clear glass.) 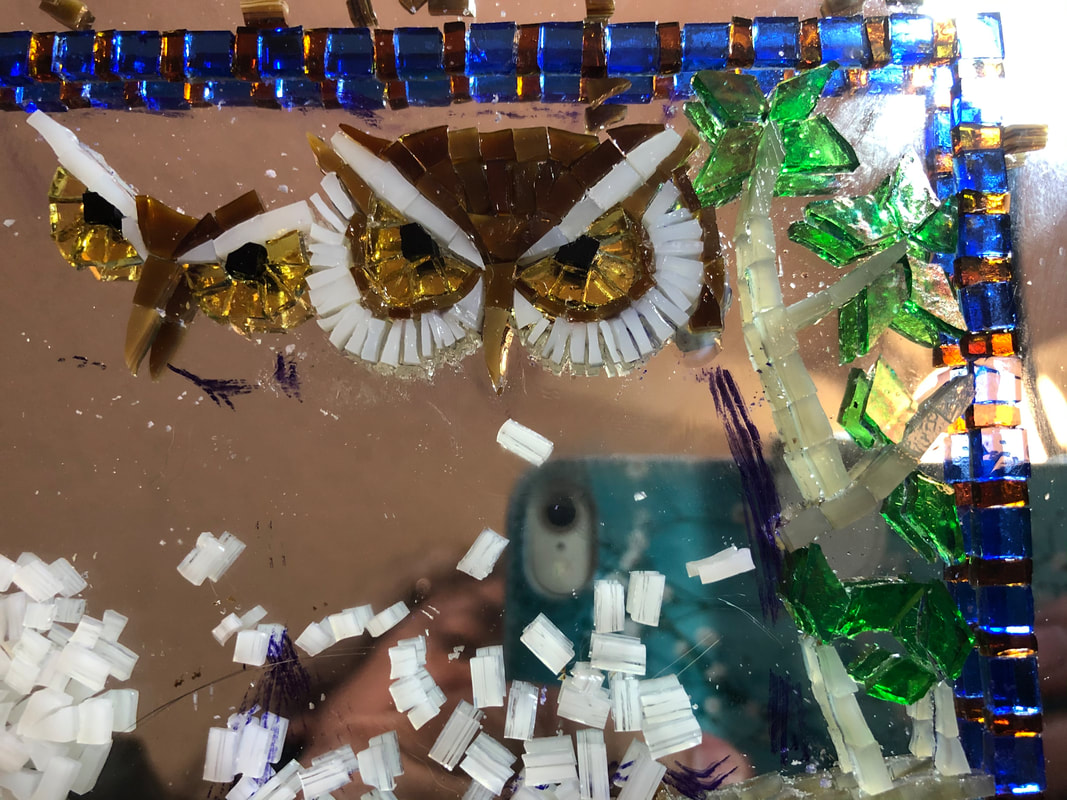 With the eyes done, I finished the outline of the owls. I wasn't ready to settle into working on the feathers, so I added more leaves. Did I mention that I loved the leaves? Not sure why but I just thought they were fun to add. 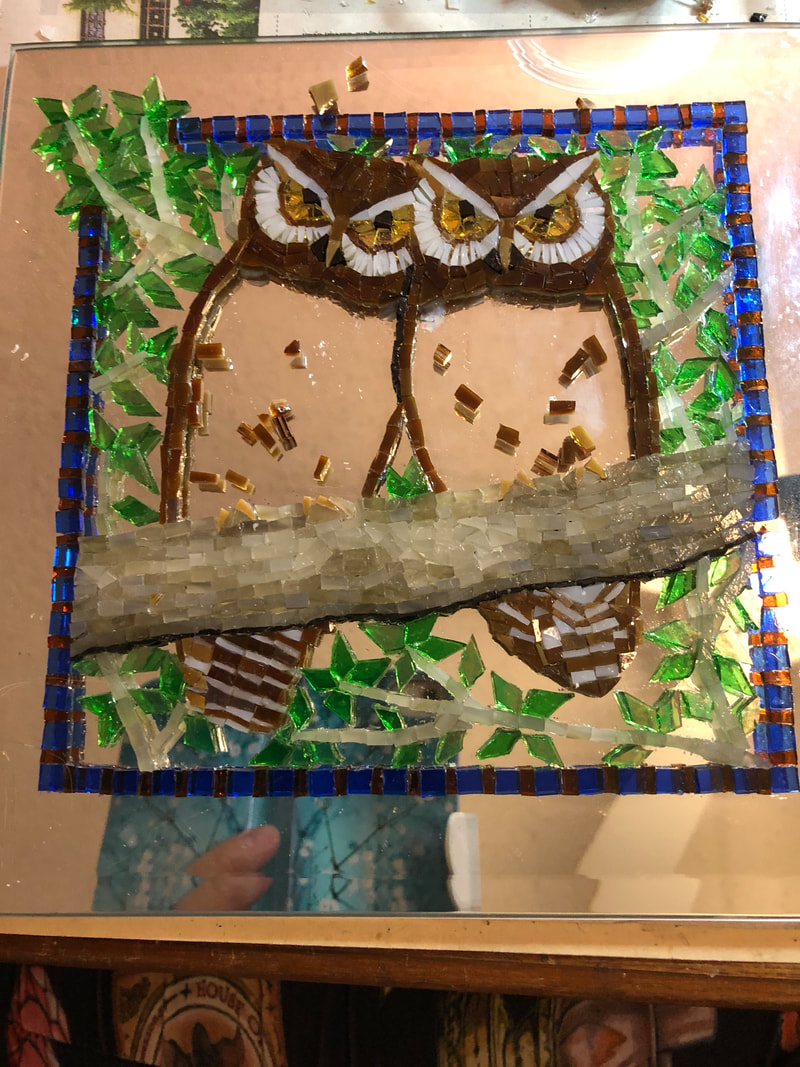 Finally finished after 83 hours of work. (I decided to keep track this time.) I took it outside for some good light for this shot. 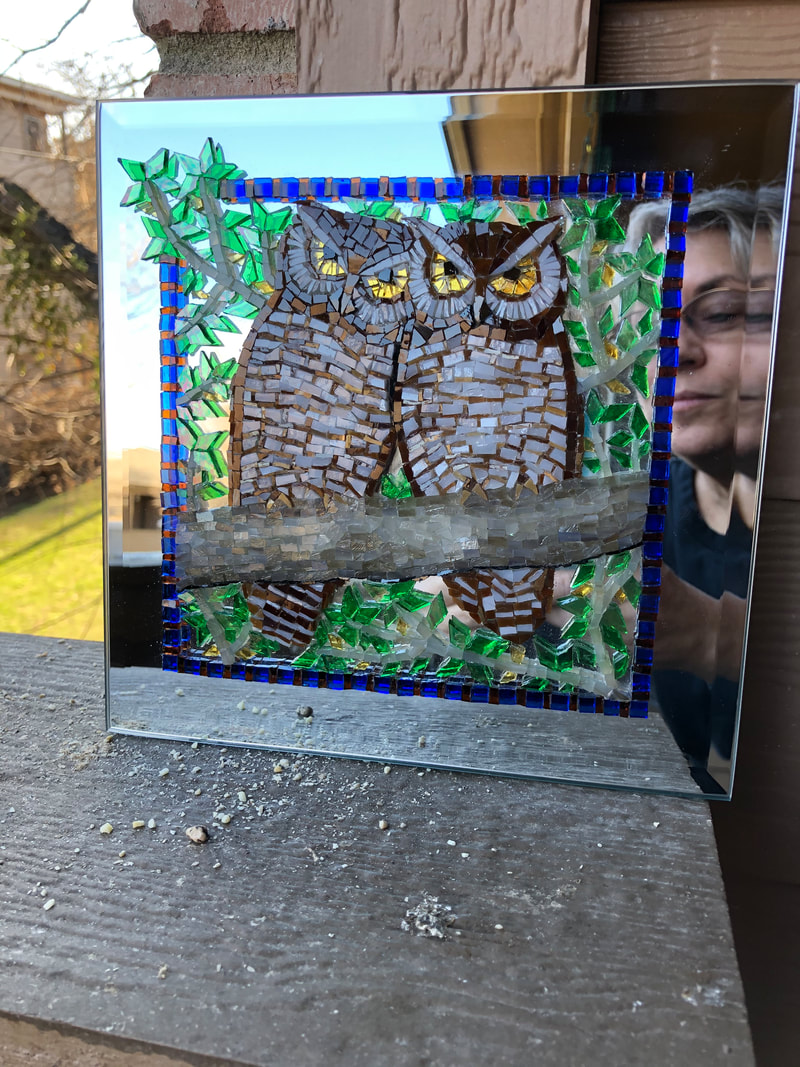 On the back, on the left & right, I put two messages. The first in Latin. m. Feb. an. MMXXI anno secundo coronae. Ginny Lindzey LXXXIII horis me fecit. February 2021, 2nd year of the corona virus. Ginny Lindzey made me in 83 hours. The second was a haiku: High in the branches the owls gaze down with wise eyes studying the world.
It now resides on my friend's wall. (The line down the middle is a reflection of a cord for the blinds.) 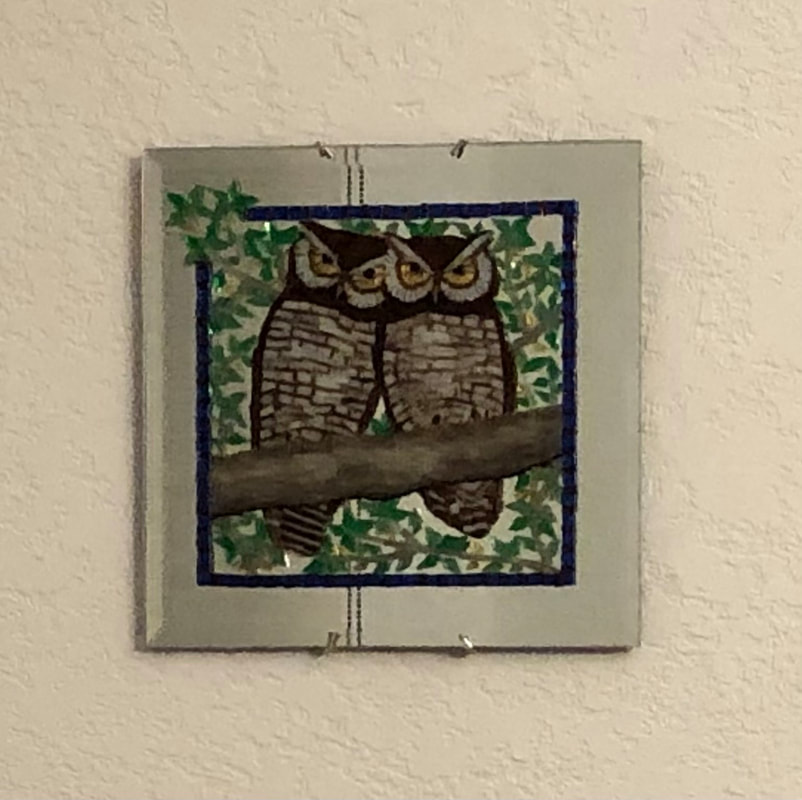 With the new year, I have returned to a format a bit larger than the ornaments. A friend had requested I try a peacock, so I started looking at photos. I had settled on this photo, but it seemed to be missing something.  I didn't think the image was interesting enough or dynamic. I did begin to sort colors of glass which I would need, but I didn't begin until after I happened to be looking through some images from the Villa of Poppaea at Oplontis. (There was a discussion about the color yellow that was used in fresco painting in the area around Pompeii.) When I saw this picture, I said to myself, "AHA!"  Look at the way the tail breaks the frame! Perfect. I was going to do a yellow/gold border like this one, but also wanted to keep the yellow/brown grass from the original photo. Romans also liked red, so I went in that direction. I traced out my design on a mirror and played around with colors to make sure everything would look okay. 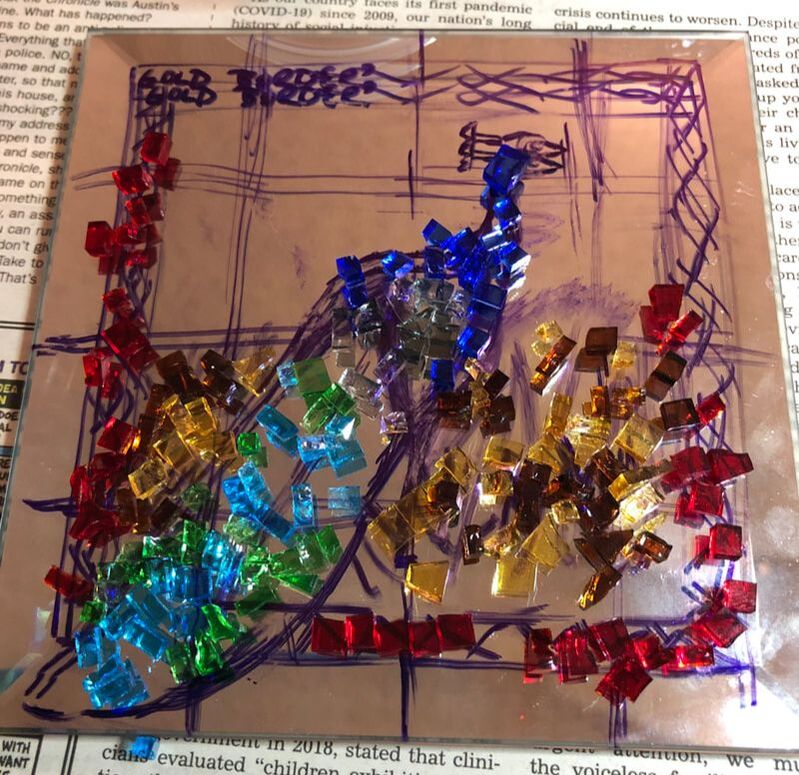 First, I would need to make the border, and I was determined that the outer edge should be as straight as possible. 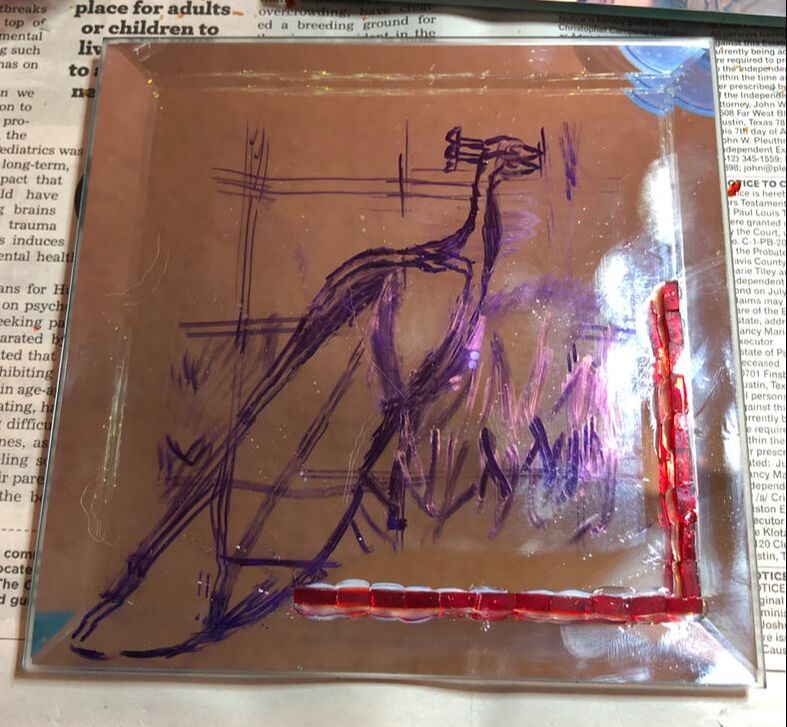 Admittedly I had to pull off part of my beginning line of red because I realized it wasn't lined up with the bevel in the mirror. But it didn't take me too long to complete the square. 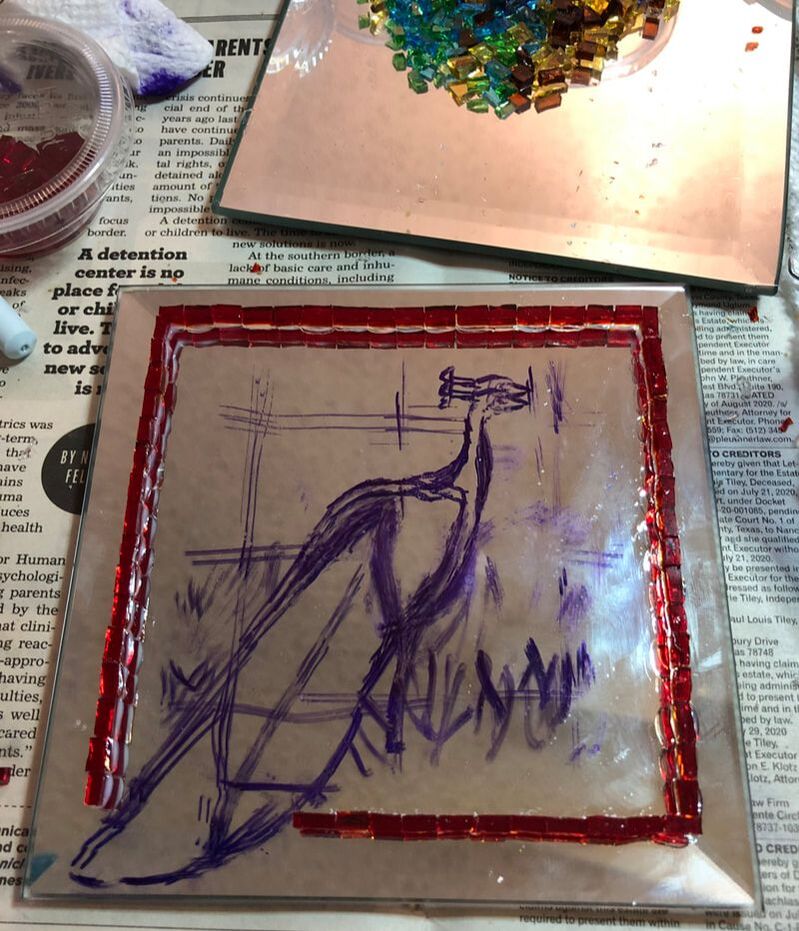 The full border I knew would not be perfect because I am still cutting my glass with nippers. The sizes would not be perfect and it would be more difficult to have perfect straight inner edges, but I tried. 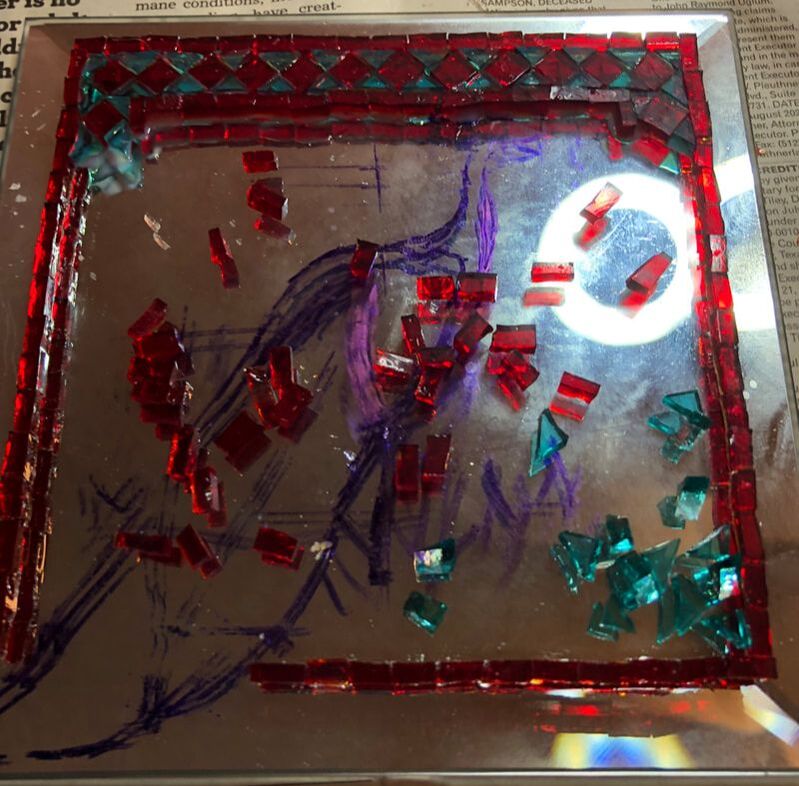 I feel like I get the most done on Sunday during Zooms with friends. We drink Prosecco, one friend tats, the other reads from her novels, and I just work on my mosaic. Sunday Zooms have been the best thing to come out of this pandemic. But I digress. 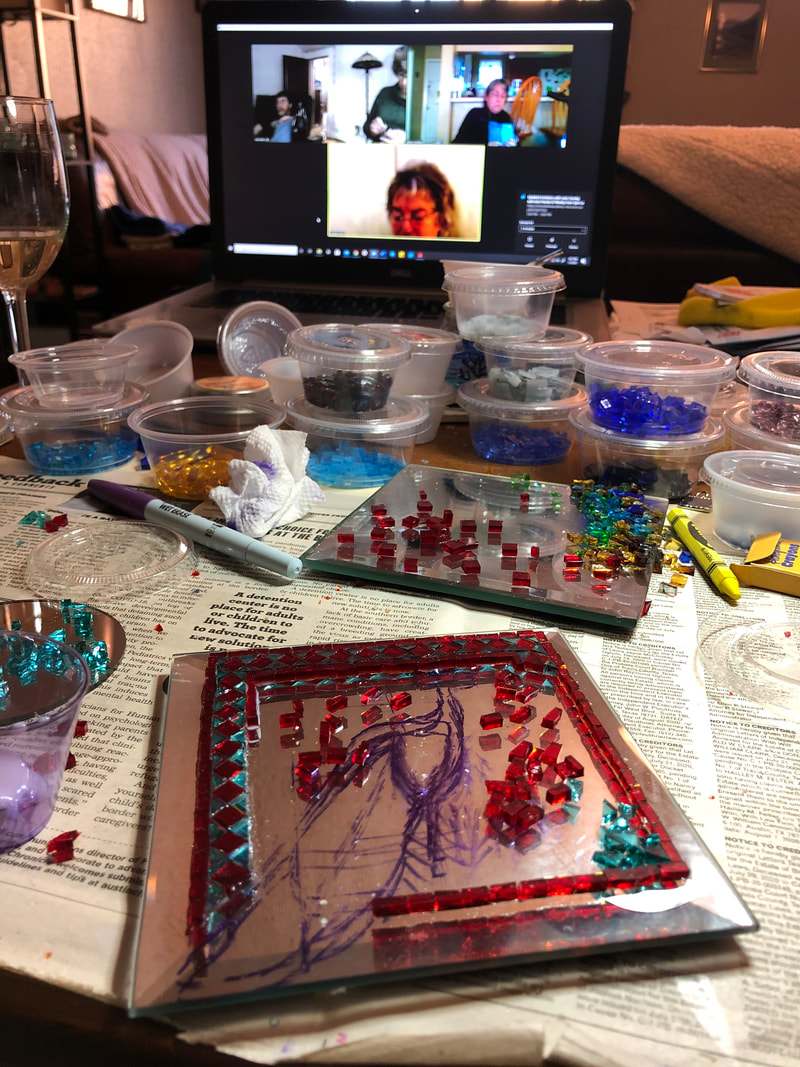 Once the border was about 98% done, I began the tail. 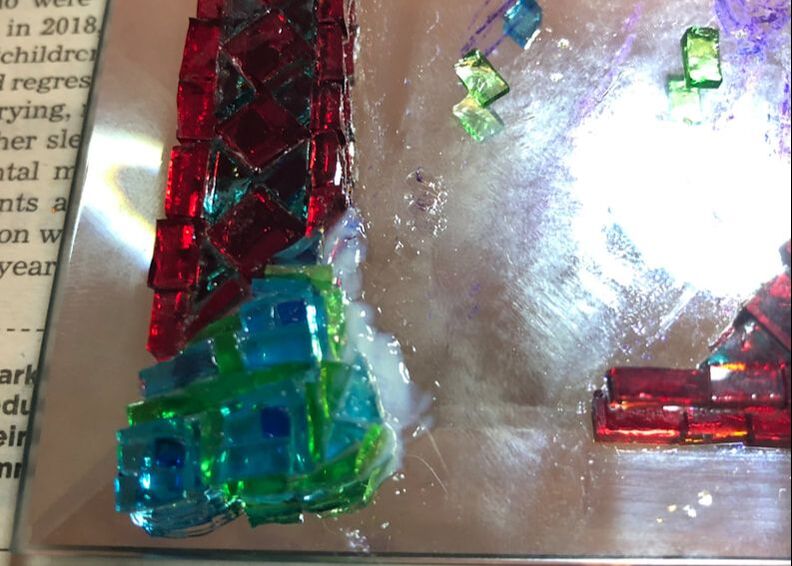 I was really pleased with how the peacock "eyes" in the tail feathers were coming out, both in shape and color. As I finished the tail, I also completed the border that is adjacent to the tail. 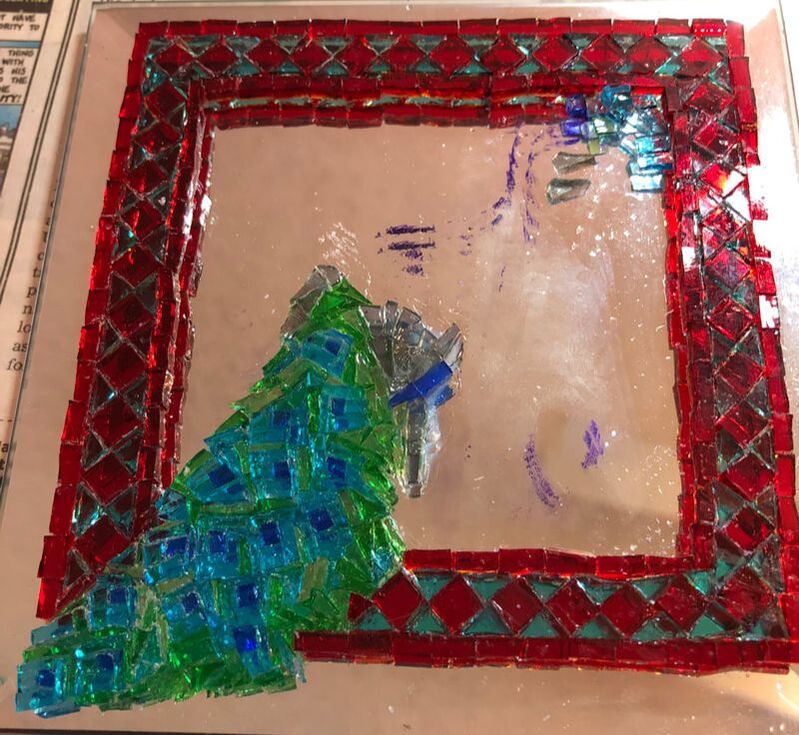 Before continuing with the body, I decided I better get the grass in. 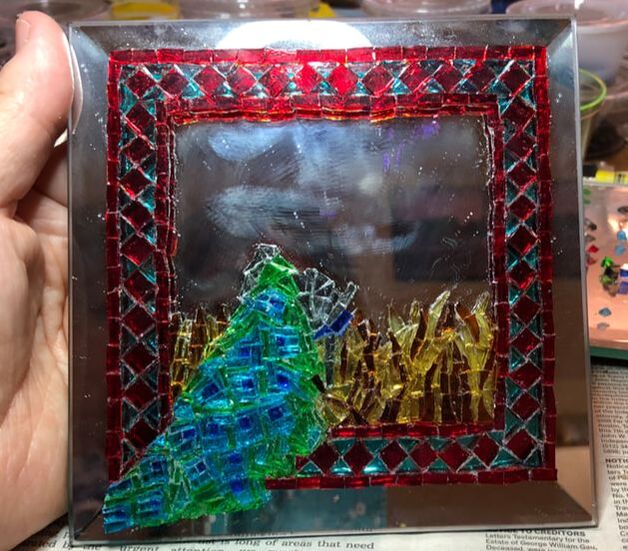 I wasn't sure that I would like the grass, but I think it turned out okay. The rest of the body didn't seem to take quite as long to do. I was afraid that my design had shifted since I had to erase the initial lines but the peacock fit. 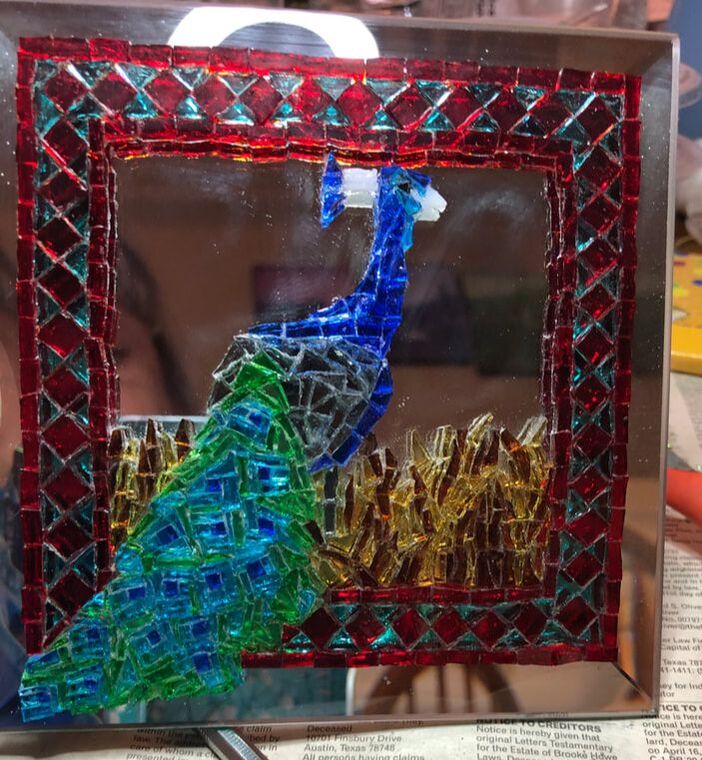 It's tricky to get a straight-on photo without getting myself or my phone in the reflection. I took a couple more photos outside to get the sunlight reflecting off of the glass and mirror. 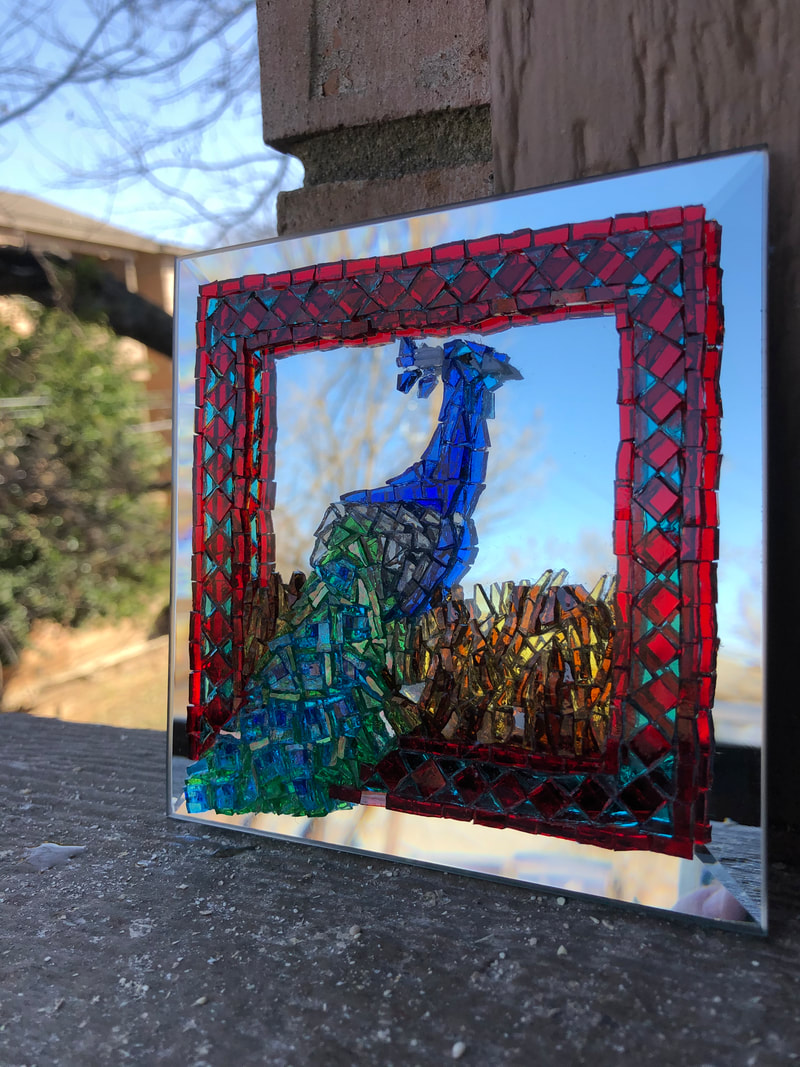 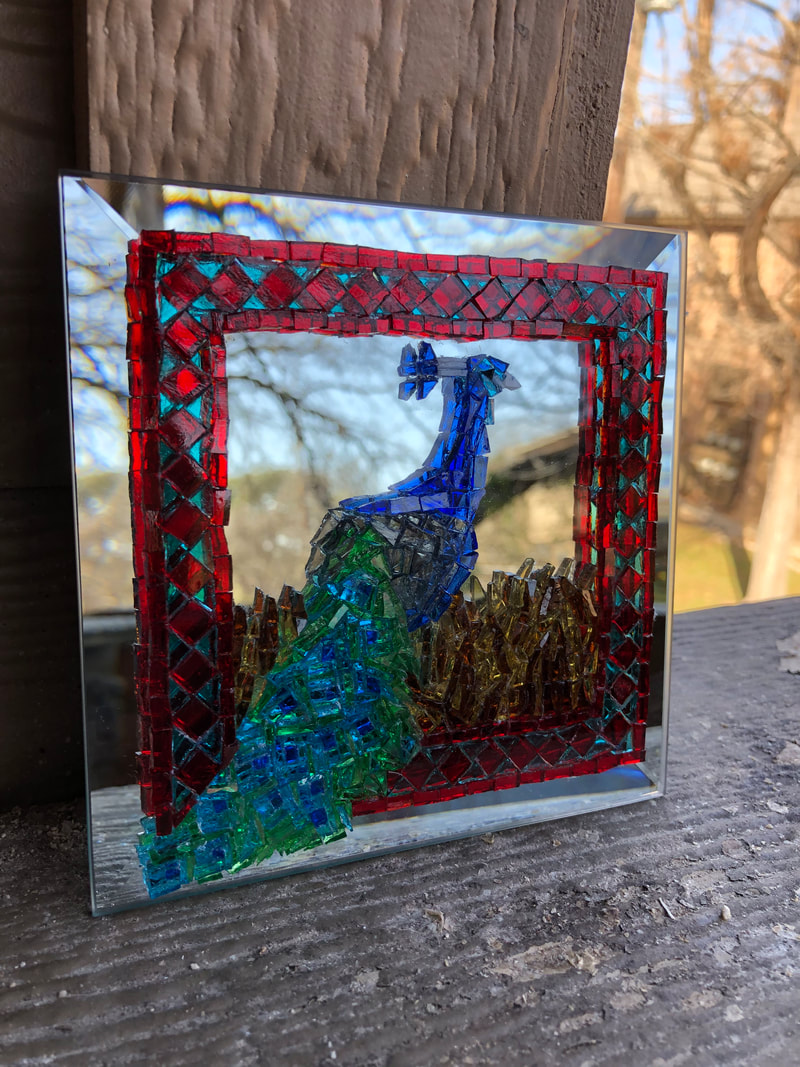 All in all I am very pleased with how this turned out. I was sad that I promised it to a friend, but she is a teacher and her school is returning to in-person learning. I think she needs this guardian more than I do.
|
AuthorRamblings of a retired Latin teacher, creative creature, and general person rediscovering life after teaching. Archives
August 2023
Categories |


 RSS Feed
